How To
Summary
The steps in the document guide you in using the IBM Global Security Kit (GSKit) to secure your Planning Analytics Data Tier (Admin Host and TM1 Server), by creating a new Certificate Signing Request, and having the certificate signed by your Certificate Authority.
Steps
CREATE A NEW KEYSTORE AND CREATE A CERTIFICATE SIGNING REQUEST
- Ensure that your TM1 Admin Server and TM1 Server are not running

- Open Command Prompt as an Administrator. Navigate to <install_dir>\tm1_64\bin64\

- Execute the following command to create a new CMS keystore named custom.kdb: gsk8capicmd_64 -keydb -create -populate -db .\ssl\custom.kdb -type cms -pw changeit -stash
*Ensure you specify your own custom password for your keystore. This example uses a password of changeit.
- Execute the following command to create a new certificate-signing request for your new keystore: gsk8capicmd_64 -certreq -create -db ".\ssl\custom.kdb" -stashed -size 4096 -sigalg "SHA256WithRSA" -label "ibmtm1_server" -dn "CN=fish2k16.canlab.ibm.com,O=IBM,OU=SUPPORT,C=CA" -san_dnsname "fish2k16.canlab.ibm.com,fish2k16" -san_ipaddr "9.24.208.121" -file ".\ssl\custom_cert_request.arm"

**Note, it is important and required that the -label of this certificate is “ibmtm1_server”
**The -size and -sigalg should reflect your organizations specific security requirements
**The -dn parameter should reflect the fully qualified address of your server
**The -san_dnsname should include the fully qualified address of your server, as well as any other dns names for the server
**The -san_ipaddr should reflect the IP address of your server
HAVE THE CERTIFICATE SIGNING REQUEST SIGNED BY A CERTIFICATE AUTHORITY
- Navigate to <install_dir>\tm1_64\bin64\ssl\ folder. Provide a copy of the custom_cert_request.arm file to the team responsible for signing your certificate.
- After the certificate has been signed, you should be provided a signed certificate as well as any intermediate and root certificates required.
**For this document, the signed certificate file is named custom_cert_signed.arm and the Intermediate and Root certificates in PEM format have been concatenated into one file named ca-chain.cert.pem
IMPORT THE SIGNED CERTIFICATES INTO THE KEYSTORE
- Copy the certificate files provided by the team who signed your certificates (your equivalent of the custom_cert_signed.arm and ca-chain.cert.pem per the previous note) to the <install_dir>\tm1_64\bin64\ssl\ directory.
- Open Command Prompt as an Administrator. Navigate to <install_dir>\tm1_64\bin64\
- Modify (as required) and execute the following command to import the Root Certificate Authority and Intermediate Certificate Authority (via the concatenated chain file) into your CAMKeystore: gsk8capicmd_64 -cert -add -db ".\ssl\custom.kdb" -stashed -label caChain -file ".\ssl\ca-chain.cert.pem" -format ascii -trust enable

- Modify (as required) and execute the following command to import the signed certificate request into your CAMKeystore: gsk8capicmd_64 -cert -receive -db ".\ssl\custom.kdb" -stashed -file ".\ssl\custom_cert_signed.arm" -default_cert yes

- Execute the following command to list the certificates in the keystore and verify that you see the ibmtm1_server certificate in the keystore: gsk8capicmd_64 -cert -list -db ".\ssl\custom.kdb" -stashed

- Execute the following command to confirm your ibmtm1_server certificate is valid: gsk8capicmd_64 -cert -validate -db ".\ssl\custom.kdb" -stashed -label ibmtm1_server

CONFIGURE THE TM1 ADMIN SERVER TO USE THE CUSTOM KEYSTORE
- Open Cognos Configuration for your TM1 Admin Server.
- In Cognos Configuration, click on TM1 Admin Server in the Explorer pane.
- Update the Key database location and Key database passwords location to reflect the custom.db and custom.sth created in the previous steps
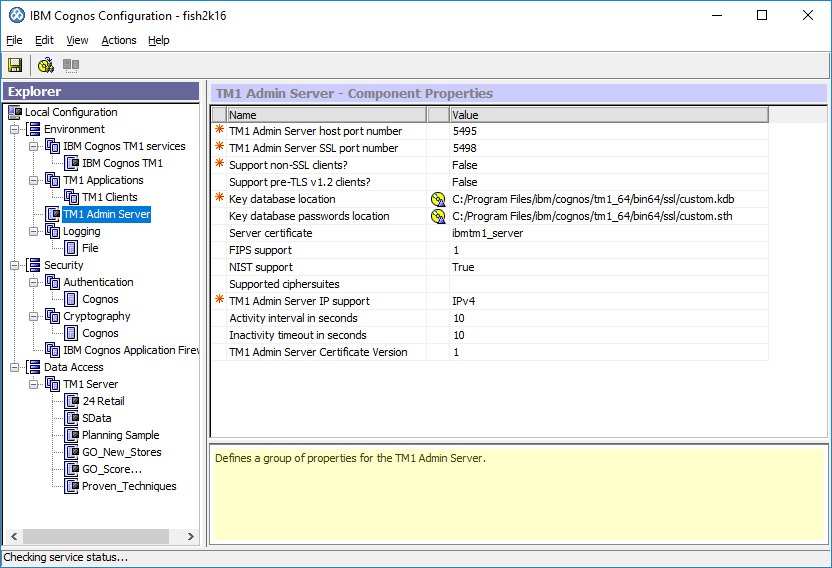
- Save the changes and Right-click> Start the TM1 Admin Server

- Proceed with validating the TM1 Admin Server configuration before you proceed with the TM1 Server (Data) configuration
VALIDATE YOUR PLANNING ANALYTICS TM1 ADMIN SERVER SSL CONFIGURATION
The following validation steps use the Chrome web browser. If you are using another browser, you need to adjust the steps as required.
- After the service has started, access your TM1 Admin Host REST API URL using Chrome, for example: https://fish2k16.canlab.ibm.com:5898/api/v1/Servers
- You might encounter a warning. If you do, it is likely because you have not yet told your computer to trust the Root Certificate Authority and Intermediate Certificate Authority used to sign the Planning Analytics certificate. Otherwise, there might be problem with your certificate. To resolve the untrusted certificate warning, see the following technote: http://www.ibm.com/support/docview.wss?uid=ibm10879929

- Assuming your certificates are valid and trusted, you should see the following - which indicates that your TM1 Admin Server is responding/using your new certificate. You will not see any TM1 Servers in the output as you have not yet completed the TM1 Server configuration.

CONFIGURE THE PLANNING ANALYTICS TM1 SERVER TO USE THE CUSTOM KEYSTORE
- Open the tm1s.cfg file for the TM1 Server instance you wish to configure
- Add the following lines to the file:
keyfile=C:\Program Files\ibm\cognos\tm1_64\bin64\ssl\custom.kdb
keystashfile=C:\Program Files\ibm\cognos\tm1_64\bin64\ssl\custom.sth
UseSSL=T
**Ensure you update the keyfile and keystashfile paths according to your environment - Save the tm1s.cfg file changes and start your TM1 Server Instance
VALIDATE YOUR PLANNING ANALYTICS TM1 DATA SERVER SSL CONFIGURATION
The following validation steps use the Chrome web browser. If you are using another browser, you need to adjust the steps as required.
- After the service has started, access your TM1 Server Host REST API URL by using Chrome, for example: https://fish2k16.canlab.ibm.com:5898/api/v1/Servers
- Assuming your certificates are valid and trusted, you should see the following - which indicates that your TM1 Admin Server is responding/using your new certificate. And assuming your tm1s.cfg has been modified correctly. You should see that your TM1 Server has been successfully registered to the TM1 Admin Server.

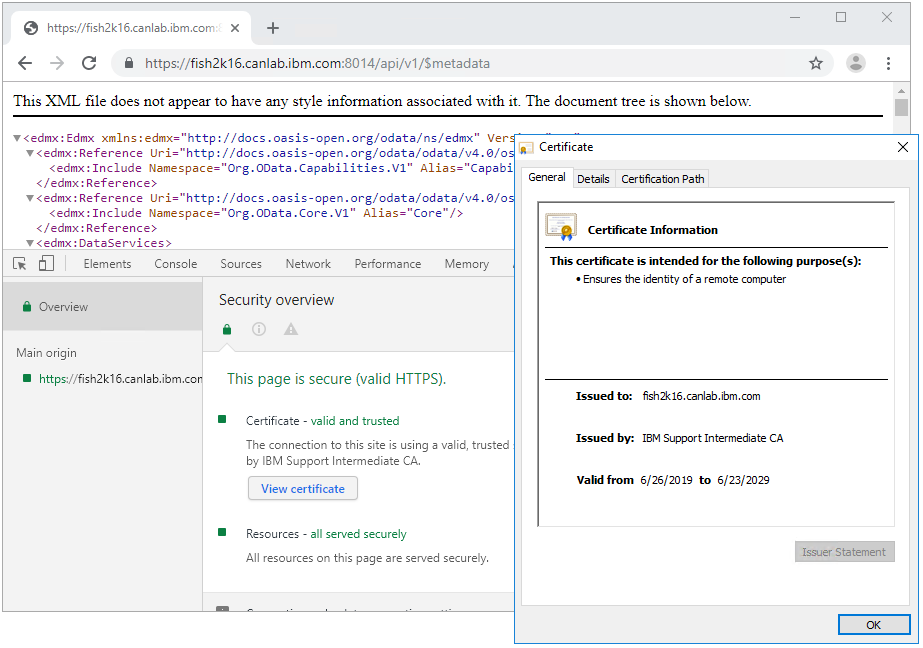
- Using the HTTPPortNumber returned in the Admin Host output, you can also test that your TM1 Server is properly secured that uses your new certificate. An example of a URL that uses the TM1 Server REST API would look like https://fish2k16.canlab.ibm.com:8014/api/v1/$metadata
ENABLING YOUR PLANNING ANALYTICS CLIENT TOOLS FOR CUSTOM SSL
As your TM1 Server is now using custom certificates, any client tool connecting to the TM1 Admin Server / TM1 Server requires the appropriate certificate to connect.
- For TM1 Architect / Perspectives, distribute the custom.kdb and custom.sth files from your TM1 Admin Server / TM1 Server install (the one modified that use this document), to your TM1 Users. Place the file into both \bin\ssl\ and \bin64\ssl\ folders in their install directory
- Create a file named tm1api.config in both the \bin\ and \bin64\ folders in their install directory
- Update the contents of the tm1api.config file with the following:
[tm1api]
keystorefile=C:\Program Files\ibm\cognos\tm1_64\bin64\ssl\custom.kdb
keystashfile=C:\Program Files\ibm\cognos\tm1_64\bin64\ssl\custom.sth - Once this has been completed, the users should be able to see/connect to the TM1 Server that uses Architect / Perspectives
**If Architect had already been opened, ensure it is closed and reopened
****If unable to see Server, try opening Architect using 'Run as Administrator'. If this works, you might have a permission problem on the file system.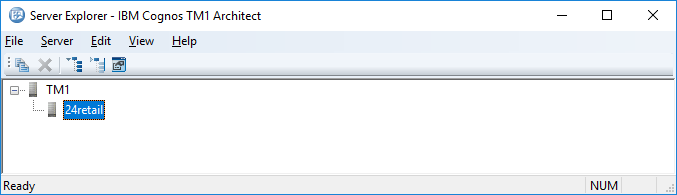
CONFIGURE PLANNING ANALYTICS TM1 WEB TO USE THE CUSTOM CERTIFICATE
- Ensure your IBM Cognos TM1 service (App Server/Web Server) is not running
- Copy the certificate files provided by the team who signed your certificates (your equivalent of the custom_cert_signed.arm and ca-chain.cert.pem per the previous steps) to the <install_dir>\tm1_64\bin64\ssl\ directory of your TM1 Web installation(s)
- Open Command Prompt as an Administrator. Navigate to <install_dir>\tm1_64\bin64\
- Modify (as required) and execute the following command to import the Root Certificate Authority and Intermediate Certificate Authority (via the concatenated chain file) into your CAMKeystore: gsk8capicmd_64 -cert -add -db "..\configuration\certs\CAMKeystore" -pw "NoPassWordSet" -label caChain -file ".\ssl\ca-chain.cert.pem" -format ascii -trust enable

- Modify (as required) and execute the following command to import the signed certificate request into your CAMKeystore: gsk8capicmd_64 -cert -add -db "..\configuration\certs\CAMKeystore" -pw "NoPassWordSet" -label custom_cert_signed -file ".\ssl\custom_cert_signed.arm" -format ascii -trust enable

- In Command Prompt, as an Administrator, navigate to <install_dir>\tm1_64\jre\bin\

- Modify (as required) and execute the following command to import the Root Certificate Authority and Intermediate Certificate Authority (via the concatenated chain file) into your TM1Store: keytool.exe -import -trustcacerts -file "..\..\bin64\ssl\ca-chain.cert.pem" -keystore "..\..\bin64\ssl\tm1store" -alias caChain -storepass applix

**Type yes when prompted to trust the certificate - Modify (as required) and execute the following command to import the signed certificate request into your TM1Store: keytool.exe -import -trustcacerts -file "..\..\bin64\ssl\custom_cert_signed.arm" -keystore "..\..\bin64\ssl\tm1store" -alias signed_cert -storepass applix

**Type yes when prompted to trust the certificate - Start your IBM Cognos TM1 (App Server/Web Server) service
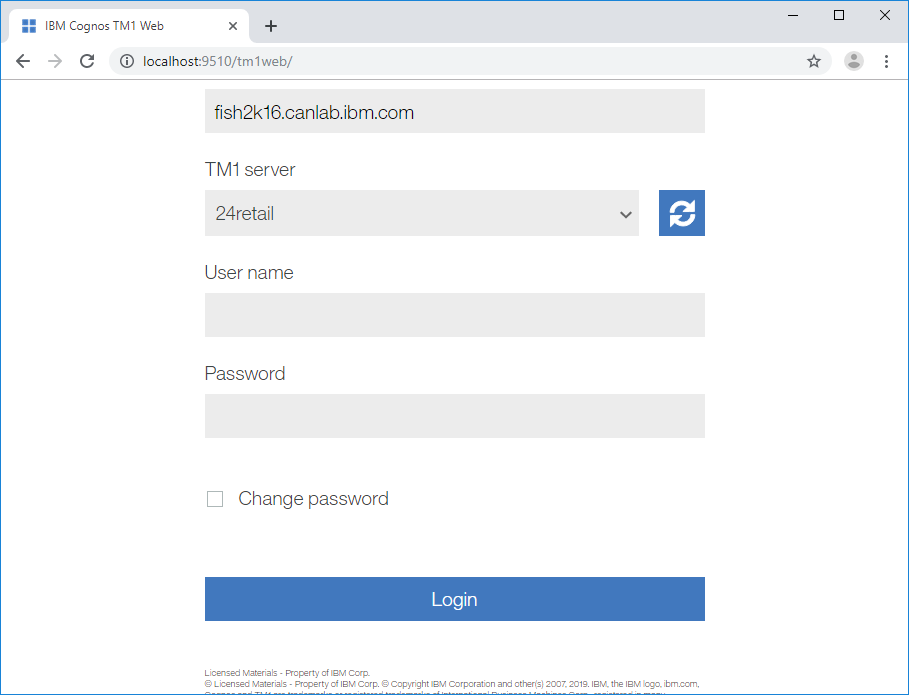
- Connect to TM1 Web via your web browser
- Assuming your certificates have been imported correctly (and your TM1 Server is running), your server should appear in the list of available servers
CONFIGURE PLANNING ANALYTICS PMPSVC/PMHUB TO USE THE CUSTOM CERTIFICATE
- Ensure your IBM Cognos TM1 service (App Server/Web Server) is not running
- Copy the certificate files provided by the team who signed your certificates (your equivalent of the custom_cert_signed.arm and ca-chain.cert.pem per the previous steps) to the <install_dir>\tm1_64\bin64\ssl\ directory of your TM1 Web installation(s)
- Create a file named tm1api.config in the <install_dir>\tm1_64\bin64\ directory
- Update the contents of the tm1api.config file with the following:
[tm1api]
keystorefile=C:\Program Files\ibm\cognos\tm1_64\bin64\ssl\custom.kdb
keystashfile=C:\Program Files\ibm\cognos\tm1_64\bin64\ssl\custom.sth - Copy the <install_dir>\tm1_64\bin64\tm1api.config file to <install_dir>\tm1_64\webapps\pmpsvc\WEB-INF\bin64\ folder
- Navigate to <install_dir>\tm1_64\wlp\usr\servers\tm1\ and open / edit the jvm.options file
- Update the contents of the jvm.options file to include the following line: -Dcom.ibm.cognos.tm1.certificate.dir=${bin_path}

- Start your IBM Cognos TM1 (App Server / Web Server) service
- Connect to PMPSVC via your web browser
- Assuming the steps have been followed correctly (and your TM1 Server is running), your server should appear in the list of available servers

**If you had already configured your PMPSVC page, you should simply be able to log in to your TM1 Server (as you would not get the initialization page)
Document Location
Worldwide
Was this topic helpful?
Document Information
Modified date:
29 June 2022
UID
ibm10957339