Question & Answer
Question
How can I configure WebSphere Application Server for Single Sign-On and SPNEGO on the IBM i?
Answer
Prerequisites
The following is a prerequisite for SPNEGO Single Sign On on WebSphere Application Server
How to configure EIM and NAS using IBM Navigator for i
NOTE: The following instructions assume the following:
- Single Signon is configured using the instructions above and 5250 Kerberos authentication is functioning normally
- A WebSphere Application Server profile is configured and able to be accessed.
Overview
Starting in V6.1, WebSphere Application Server enables use of a Simple and Protected GSSAPI Negotiation Mechanism (SPNEGO) to authenticate users using Windows domain credentials when accessing secured resources. This document describes the configuration necessary to enable single sign-on (SSO) in WebSphere Application Server using SPNEGO. In this web serving environment, users log on to their Windows workstation using a domain account. The user is authenticated to IBM i using their Windows domain credentials. The credentials are mapped to an IBM i user profile for use in authorizing the user to IBM i resources.
A Windows domain uses a Kerberos-based authentication method. SPNEGO enables web application servers and web browsers to automatically negotiate authentication using the Kerberos-based Windows credentials from the domain authentication instead of using HTTP Basic Authentication (in which the browser prompts for user credentials) or form-based authentication (in which a web page containing a form is used to prompt for user credentials).
With SPNEGO, SSO is extended to the Windows workstation log-on, and the user is not prompted to provide additional credentials.
Once SPNEGO is configured all traffic that goes through to the WAS server is using SPNEGO.
Example Environment
|
IBM i system |
RCH730B.711.LAB |
|
LDAP server |
RCH730B.711.LAB (assuming the same IBM i is the LDAP server) |
|
Realm name (Windows domain) |
711.LAB |
|
AD/KDC name (Windows domain controller) |
CTAWINSVR.711.LAB |
|
KDC port |
88 |
|
Service principal password |
kerberos |
|
EIM domain controller (LDAP server) |
RCH730B.711.LAB |
|
EIM domain controller port |
389 |
|
LDAP administrator distinguished name |
cn=administrator |
|
LDAP administrator password |
secret |
|
EIM domain |
Eim |
|
User account |
krbsvr400_rch730b |
|
Service principal name |
krbsvr400/rch730b.711.lab@711.LAB |
|
Password |
kerberos |
|
User account |
rch730b_1_HTTP |
|
Service principal name |
HTTP/rch730b.711.lab@711.LAB |
|
Password |
kerberos |
|
IBM Web Administration for i URL |
http://RCH730B.711.LAB:2001/HTTPAdmin |
|
WebSphere Application Server option |
V8.5 Express |
|
Application server name |
WAS85GBM01 |
|
HTTP server name |
WEBGBM01 |
|
HTTP server IP address |
All IP addresses |
|
HTTP server port |
27600 |
|
Application server first port in range |
27605 |
|
WebSphere Integrated Solutions Console URL |
http://RCH730B.711.LAB:27606/ibm/console/ |
|
Administrative user name |
wasadmin |
|
Type of LDAP server |
Microsoft Active Directory |
|
LDAP server name |
CTAWINSVR.711.LAB |
|
LDAP server port |
389 |
|
Base distinguished name |
DC=711,DC=LAB |
|
Bind distinguished name |
cn=wasadmin,cn=users,dc=711,dc=LAB |
|
Bind password |
wasadmin |
|
Kerberos configuration file |
/QIBM/UserData/OS400/NetworkAuthentication/ krb5.conf |
|
User profile (USRPRF) |
TSMITH |
|
Password (PASSWORD) |
*NONE |
|
Text 'description' (TEXT) |
User profile for Tom Smith |
|
Home directory (DIR) |
/home/TSMITH |
|
EIM identifier name |
Tom Smith/Rochester/IBM |
|
Windows domain EIM registry (Windows domain) (Realm name) |
711.LAB |
|
Windows domain user account |
toms |
|
IBM i EIM registry (IBM i system) |
RCH730B.711.LAB |
|
IBM i user profile |
TSMITH |
1) Ensure the required HTTP service principal(s) exists and was created with the proper case.
Execute the following commands from a 5250 session to verify the HTTP service principal exists and is in the proper case.STRQSH
keytab list
The output should contain 6 entries for the HTTP service principal with (at a minimum) the IBM i Fully Qualified Domain Name (host.domain) in all lowercase. If you see your HTTP service principal host is in all UPPERCASE, IBM strongly recommends you remove it and re-add it in all lowercase by following the "How do I remove and/or add my HTTP service principal?" instructions below.
Example keytab list output (The bolded host name should be in all lowercase):
Principal: HTTP/rch730b.711.lab@711.LAB
Key version: 1
Key type: 128-bit AES
Entry timestamp: 2019/02/14-09:43:24
Principal: HTTP/rch730b.711.lab@711.LAB
Key version: 1
Key type: 256-bit AES
Entry timestamp: 2019/02/14-09:43:24
Principal: HTTP/rch730b.711.lab@711.LAB
Key version: 1
Key type: ARCFOUR
Entry timestamp: 2019/02/14-09:43:24
Once you have verified the required HTTP service principal(s) exist and its host name value is in all lowercase characters, proceed to the next step.
How do I remove and/or add my HTTP service principal?
STRQSH

keytab listIdentify the incorrect HTTP service principal.
keytab delete <httpServicePrincipal>i.e.
keytab delete HTTP/rch730b.711.labM@711.LABDelete the Active Directory IBM i HTTP user account, i.e. <ibmi>_x_HTTP, associated with the old IBM i HTTP service principal.
- Adding a new HTTP service principal with an all lowercase host.
Step 1: Add the new HTTP service principal from a 5250 session.
STRQSHkeytab add HTTP/host.domain@WINDOWSDOMAIN -p <password> keytab add HTTP/rch730b.711.lab@711.LAB -p kerberosNote: The format and password for this principal name is recommended to be the same value as the NAS krbsrvr400 service principal (krbsvr400/host.domain@WINDOWSDOMAIN). The host.domain should be in all lowercase and the WINDOWSDOMAIN should be in all uppercase.
Step 2: Create a new Active Directory service user account (<ibmi>_x_HTTP) associated with the IBM i HTTP service principal. The user can have any password, but it must match the password (myHTTPpassword) assigned to the HTTP service principal in the IBM i OS keytab file created in the previous step.
NOTE: The DSADD and ktpass commands should be ran as an Administrative user on the Active Directory server.
DSADD user "cn=RCH730B_1_HTTP,cn=users,dc=711,dc=LAB" -pwd kerberos -display RCH730B_1_HTTP -pwdneverexpires yes -desc "IBM i HTTP services on system RCH730B"ktpass -princ HTTP/host.domain@WINDOWDOMAIN -mapuser <ActiveDirectoryUsername> -pass <ActiveDirectoryUserPassword> -mapop set -crypto All -ptype KRB5_NT_PRINCIPALSETSPN -A HTTP/host.domain@WINDOWDOMAIN <ActiveDirectoryUsername>i.e.
ktpass -princ HTTP/rch730b.711.lab@711.LAB -mapuser RCH730B_1_HTTP -pass kerberos -mapop set -crypto All -ptype KRB5_NT_PRINCIPALSETSPN -A HTTP/rch730b.711.lab@711.LAB RCH730B_1_HTTP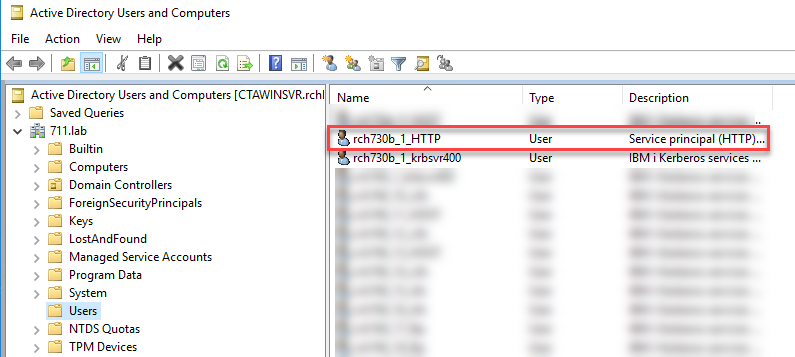
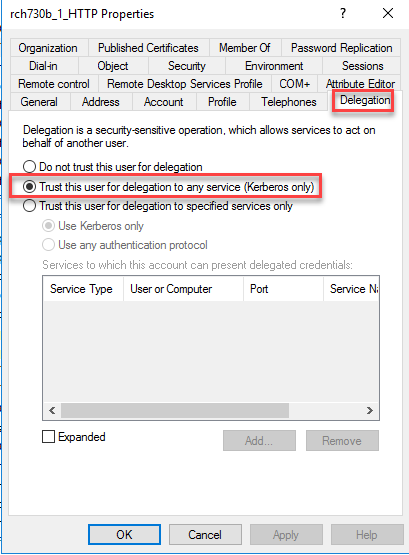
Right-click on the <ibmi>_x_HTTP user account and click on Properties.
On the properties panel, click on the Delegation tab.
Click the radio button next to "Trust this user for delegation to any service (Kerberos only)".
Click the Apply and then OK buttons to confirm the change.
Step 5: Change the encryption and password account options for the Active Directory HTTP user account.
Right-click on the <ibmi>_x_HTTP user account and click on Properties.
On the properties panel, click on the Account tab.
Under the Account options section, check the box next to "Password never expires" if it is not already checked.
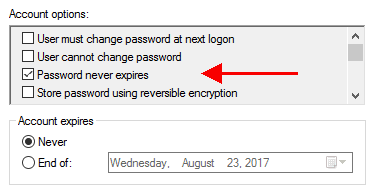
Under the Account options section, check the box(es) for the AES 256 and/or 128 bit encryption types. Uncheck the box for DES encryption.

Click the Apply and then OK buttons to confirm the change.
kinit -k HTTP/host.domain@WINDOWSDOMAINkinit -k HTTP/rch730b.711.lab@711.LAB$2) Configure WebSphere Application Server
A WebSphere Application Server (WAS) profile must be created on the IBM i system and configured to use SPNEGO for authentication. This involves creating the WebSphere Application Server profile and associated HTTP server, securing the profile using Microsoft Active Directory as the user repository, configuring the profile for single sign-on, and configuring the profile to use SPENGO for authentication. Once the profile has been SPNEGO-enabled, applications can be deployed in the profile.
Note : Before you move forward make sure the QEJBSVR user profile gets access rights on the keytab files:
When the standard location is used run the command :
"CHGAUT OBJ('/QIBM/UserData/OS400/NetworkAuthentication/keytab/krb5.keytab') USER(QEJBSVR) DTAAUT(*RX) OBJAUT(*ALL)"
- Secure Profile Using Microsoft Active Directory
The following information describes how to secure a WebSphere Application Server profile using Microsoft Active Directory as a user account repository. Use the security configuration wizard from the security tasks in the WebSphere Integrated Solutions Console to secure the WebSphere Application Server profile. There are several options for user account repositories when securing a WebSphere Application Server profile. The default user account repository is built into WebSphere Application Server and can be federated with one or more external LDAP repositories. Other options include a stand-alone external LDAP registry or the local operating system.
For more information on securing a WebSphere Application Server profile, see the Securing applications and their environment article in the WebSphere Application Server information center. The WebSphere Application Server information centers can be found at the WebSphere Application Server Library (https://www.ibm.com/docs/en/was).
This task secures the WebSphere Application Server profile using Microsoft Active Directory as a stand-alone LDAP registry. This task assumes the WebSphere Application Server profile is already running.
WebSphere Integrated Solutions Console URL
http://RCH730B.711.LAB:27606/ibm/console/
Administrative user name
wasadmin
Type of LDAP server
Microsoft Active Directory
LDAP server name
CTAWINSVR.711.LAB
LDAP server port
389
Base distinguished name
DC=711,DC=LAB
Bind distinguished name
cn=wasadmin,cn=users,dc=711,dc=LAB
Bind password
wasadmin
Sample values from example environment used in the secure profile task
Securing a WebSphere Application Server profile using Microsoft Active Directory as a stand-alone LDAP registry consists of the following steps:
1. Open a browser window.
2. Specify the URL to the WebSphere Integrated Solutions Console for the profile (for example, specify http://RCH730B.711.LAB:27606/ibm/console/).
3. Select Log in to log on to the console (credentials are not required until security is enabled).
4. Select Security > Global security in the list of tasks.
5. Select Security Configuration Wizard to start a wizard for enabling security.
6. Specify the security options on the Specify extent of protection page.
a. Select the Enable application security option if it is not already selected.
b. Clear the Use Java 2 security to restrict application access to local resources option if it is not already cleared.
c. Select Next.
7. Select Standalone LDAP registry on the Select user repository page; select Next.
8. Specify information about the LDAP registry on the Configure user repository page.
a. Specify the administrative user name in the Primary administrative user name field (for example, specify wasadmin).
b. Select the type of LDAP server in the Type of LDAP server field (for example, select Microsoft Active Directory).
c. Specify the name of the LDAP server in the Host field (for example, specify CTAWINSVR.711.LAB).
d. Specify the port used by the LDAP server in the Port field (for example, specify 389).
e. Specify the base distinguished name used for searches in the directory in the Base distinguished name (DN) field (for example, specify DC=711,DC=LAB).
f. Specify the distinguished name used to bind to the LDAP server in the Bind distinguished name (DN) field (for example, specify cn=wasadmin,cn=users,DC=711,DC=LAB).
g. Specify the password used to bind to the LDAP server in the Bind password field (for example, specify wasadmin).
h. Select Next.
9. Review the information on the Summary page; select Finish to complete the wizard.
10. Select Save in the Messages box at the top of the page to save the changes.
- Configure Single Sign-on
The following information describes how to configure single sign-on for a WebSphere Application Server profile. Use the WebSphere Integrated Solutions Console to configure single sign-on for the WebSphere Application Server profile. This task assumes the Secure Profile Using Microsoft Active Directory task has just been completed.
The WebSphere Integrated Solutions Console is displaying the Global security page
Domain name (Network domain name)
711.LAB
LTPA cookie names
LtpaToken
LtpaToken2
Sample values from example environment used in the configure single sign-on task
Configuring single sign-on for a WebSphere Application Server profile consists of the following steps:
1. Select Web and SIP security > Single sign-on (SSO) in the Authentication group.
2. Select the Enabled option if it is not already selected.
3. Clear the Requires SSL option if it is not already cleared.
4. Specify the network domain name in the Domain name field (for example, specify 711.LAB) (case sensitive).
5. Select the Interoperability Mode option if it is not already selected.
6. Specify the names for the LTPA cookies:
a. Specify the name for the LTPA V1 cookie in the LTPA V1 cookie name field (for example, specify LtpaToken).
b. Specify the name for the LTPA V2 cookie in the LTPA V2 cookie name field (for example, specify LtpaToken2).
7. Select the Web inbound security attribute propagation option if it is not already selected.
8. Select the Set security cookies to HTTPOnly to help prevent cross-site scripting attacks option if it is not already selected.
9. Select OK.
10. Select Save in the Messages box at the top of the page to save the changes.
- Configure SPNEGO
The following information describes how to configure SPNEGO for a WebSphere Application Server profile. Use the WebSphere Integrated Solutions Console to configure SPNEGO for the WebSphere Application Server profile. WebSphere Application Server provides SPNEGO support via SPNEGO web authentication.
This task assumes the Configure Single Sign-on task has just been completed. The WebSphere Integrated Solutions Console is displaying the Global security page
IBM i system
RCH730B.711.LAB
Kerberos configuration file
/QIBM/UserData/OS400/NetworkAuthentication/krb5.conf
Sample values from example environment used in the configure SPNEGO web authentication task
Configuring SPNEGO web authentication for a WebSphere Application Server consists of the following steps:
1. Select Web and SIP security > SPNEGO web authentication in the Authentication group.
2. Select the New under SPNEGO Filters.
3. Specify information to configure the filter.
a. Specify the name of your IBM i system in the Host name field (for example, specify RCH730B.711.LAB).
b. Select the Trim Kerberos realm from principal name option.
c. Select the Enable delegation of Kerberos credentials option.
d. Select OK.
4. Clear the Use the alias host name for the application server option.
5. Clear the Dynamically update SPNEGO option if it is not already cleared.
6. Select the Enable SPNEGO option.
7. Clear the Allow fall back to application authentication mechanism option if it is not already cleared.
8. Specify the fully-qualified path to the JGSS Kerberos configuration file in the Kerberos configuration file with full path field (for example, specify /QIBM/UserData/OS400/NetworkAuthentication/krb5.conf).
9. Specify the full-qualified path to the JGSS Kerberos keytab file (For example /QIBM/UserData/OS400/NetworkAuthentication/keytab/krb5.keytab).
10. Select OK.
11. Select Save in the Messages box at the top of the page to save the changes.
12. Select Logout to log out of the WebSphere Integrated Solution Console.
13. Restart the WebSphere Application Server profile to enable the security changes.
The following information describes how to configure the browser to enable SPNEGO. Internet Explorer, Mozilla Firefox, and Google Chrome support SPNEGO. This task provides steps for configuring each browser. Use the steps for the browser used in your environment.
Microsoft Edge/Internet Explorer
This task assumes you are logged on to a workstation in the Windows domain using a Windows domain user account.
|
base URL |
http://RCH730B.711.LAB |
|
WebSphere Integrated Solutions Console base URL |
https://RCH730B.711.LAB |
Sample values from example environment used in the Microsoft Edge configuration task
Configuring Microsoft Edge to enable SPNEGO consists of the following steps:
- From the Internet Explorer menu, select Tools > Internet Options and then click the Security tab.
- Click the Local intranet icon and then click Sites.
- Click Advanced and then add the web address of the host name of your Connections server into the Add this website to the zone field. For example: *.enterprise.example.com. Click Add.
- Enter the host name of your HTTP Server into the Add this website to the zone field and click Add. For example: http://<IHS_host> or https://IHS_host>".
- Click OK to save the change and return to the main Security page.
- Click Custom level, scroll to find User Authentication > Logon, and select Automatic logon only in Intranet zone. Click OK to save the change and return to the main Security page.
- If you are using Edge, you must set the trust settings in Microsoft™ Internet Explorer. Click the Trusted sites icon and then click Sites. Click Add.
- Enter the SPNEGO URL into the Add this website to the zone field and click Add.
- Click the Advanced tab, scroll to find Security, and then select the Enable Integrated Windows Authentication check box. Click OK to save the change.
- Restart the web browser to apply the configuration changes.
Mozilla Firefox
This task assumes you are logged on to a workstation in the Windows domain using a Windows domain user account.
|
IBM i system |
RCH730B.711.LAB |
Sample values from example environment used in the Mozilla Firefox configuration Task
Configuring Mozilla Firefox to enable SPNEGO consists of the following steps:
1. Open Mozilla Firefox
2. Specify about:config in the Go to a Website field
3. Select I'll be careful, I promise! in the This might void your warranty! window
4. Specify network.n in the Filter field or ‘negotiate’
5. Select the network.negotiate-auth.delegation-uris preference in the list of preferences
6. Press Enter to modify the value
7. Specify the name of your IBM i system in the input field (for example, specify RCH730B.711.LAB)
8. Select OK
9. Select the network.negotiate-auth.trusted-uris preference in the list of preferences
10. Press Enter to modify the value
11. Specify the name of your IBM i system in the input field (for example, specify RCH730B.711.LAB)
12. Select OK
13. Restart Mozilla Firefox to enable the changes
Google Chrome
|
IBM i system |
RCH730B.711.LAB |
Sample values from example environment used in the Google Chrome configuration task
The following steps are available for the latest version of Chrome:
https://cloud.google.com/docs/chrome-enterprise/policies/#httpAuthentication
The procedure to enable SPNEGO on Chrome is like Windows 10. After you complete steps a,b, and c in “Configuring Edge on Windows 10 to enable SPNEGO”, perform the following special steps for Chrome:
a. Open Microsoft Registry Editor by typing regedit.exe in Run window.
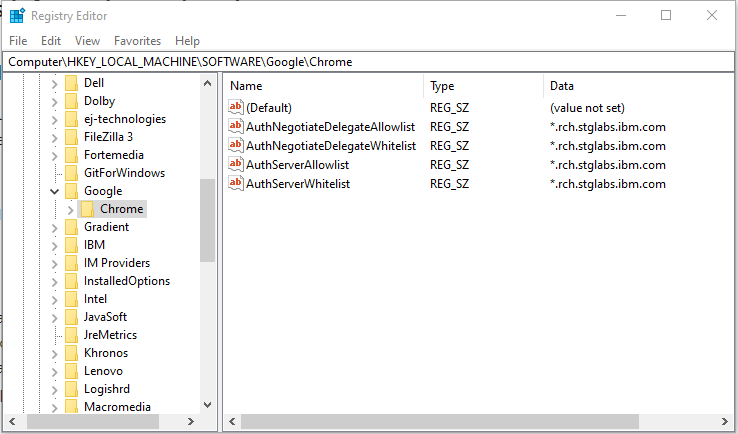
b. Google Chrome uses a few different policies to enable SPNEGO support. IBM recommends all 4 policies are added to your browser even though some are deprecated. Adding all 4 policies ensures all required policies are set to enable SPENGO support.
- The AuthNegotiateDelegateAllowlist policy assigns servers that Google Chrome my delegate to.
- The AuthNegotiateDelegateWhitelist policy assigns servers that Google Chrome may delegate to. (deprecated)
- The AuthServerAllowlist policy specifies which servers should be allowed for integrated authentication.
- The AuthServerWhitelist policy specifies which servers should be allowed for integrated authentication. (deprecated)
c. The policies are stored in the Windows registry under HKEY_LOCAL_MACHINE\Software\Policies\Google\Chrome. If the key at the end of the path (Google or Chrome) does not exist, you can manually create it (Right-click -> New -> String Value). The Type of the policy is a String Value (REG_SZ).
d. Multiple servers are separated with commas.
e. Wildcards (*) are allowed in the names.
f. The value of the policy would be the web domain being accessed. i.e. *.711.lab
g. Ensure all 4 policies, AuthNegotiateDelegateAllowlist, AuthNegotiateDelegateWhitelist, AuthServerAllowlist, and AuthServerWhitelist, are added.
You can confirm your browser policies by entering "chrome://policy" in the browser address bar and press ENTER. The browser policies in blue are currently active and being used in the current browser session.
If you are not able to access the page in the SPNEGO-enabled environment, it is necessary to determine which part of the environment is not working correctly. This involves listing the contents of the client ticket cache, listing the contents of the keytab files, testing the EIM mapping for the user, and enabling diagnostic tracing for the WebSphere Application Server profile.
List Contents of Client Ticket Cache
The following information describes how to list the contents of the Kerberos ticket cache on the Windows workstation. Use the klist command to list the contents of the Kerberos ticket cache. The klist command can be downloaded from Microsoft. This task assumes you are logged on to a workstation in the Windows domain using a Windows domain user account. Listing the contents of the Kerberos ticket cache consists of the following steps:
1. Open a command prompt
2. List the ticket cache using the klist command The following example lists the ticket cache. klist tickets
C:\Windows\system32>klist tickets
Current LogonId is 0x12b:0x5fd45d4a
Cached Tickets: (3)
#0> Client: toms @ 711.LAB
Server: krbtgt/711.LAB @ 711.LAB
KerbTicket Encryption Type: AES-256-CTS-HMAC-SHA1-96
Ticket Flags 0x60a10000 -> forwardable forwarded renewable
pre_authentname_canonicalize
Start Time: 9/21/2023 7:45:04 (local)
End Time: 9/21/2023 17:45:04 (local)
Renew Time: 9/28/2023 7:45:04 (local)
Session Key Type: AES-256-CTS-HMAC-SHA1-96
Cache Flags: 0x2 -> DELEGATION
Kdc Called: CTAWINSVR
#1> Client: toms @ 711.LAB
Server: krbtgt/711.LAB @ 711.LAB
KerbTicket Encryption Type: AES-256-CTS-HMAC-SHA1-96
Ticket Flags 0x40e10000 -> forwardable renewable initial
pre_authentname_canonicalize
Start Time: 9/21/2023 7:45:04 (local)
End Time: 9/21/2023 17:45:04 (local)
Renew Time: 9/28/2023 7:45:04 (local)
Session Key Type: AES-256-CTS-HMAC-SHA1-96
Cache Flags: 0x1 -> PRIMARY
Kdc Called: CTAWINSVR
#2> Client: toms @ 711.LAB
Server: krbsvr400/rch730b.711.lab @ 711.LAB
KerbTicket Encryption Type: AES-256-CTS-HMAC-SHA1-96
Ticket Flags 0x40a50000 -> forwardable renewable
pre_authent ok_as_delegate name_canonicalize
Start Time: 9/21/2023 7:45:04 (local)
End Time: 9/21/2023 17:45:04 (local)
Renew Time: 9/28/2023 7:45:04 (local)
Session Key Type: AES-256-CTS-HMAC-SHA1-96
Cache Flags: 0
Kdc Called: CTAWINSVR
List Contents of Keytab Files
The following information describes how to list the contents of the keytab files on the IBM i system.
Use the keytab command in the Qshell environment to list the contents of the keytab files.
|
IBM I keytab file |
/QIBM/UserData/OS400/NetworkAuthentication/keytab/krb5.keytab |
|
SPNEGO keytab file (if a specific one is used) |
/QIBM/UserData/OS400/NetworkAuthentication/keytab/spnego.krb5.keytab |
Sample values from example environment used in the list contents of keytab files task
Listing the contents of the keytab files using the keytab command in the Qshell environment consists of the following steps:
1. Start a 5250 display session to the IBM i system
2. Sign on using a user profile with authority to read files in the /QIBM/UserData/OS400/NetworkAuthentication/keytab directory
3. Start the Qshell environment using the QSH CL command
4. List the contents of the keytab file used by the network authentication service on the IBM i system : keytab list
5. List the contents of the SPNEGO keytab file used with JGSS for the WebSphere Application Server profile
keytab list -k /QIBM/UserData/OS400/NetworkAuthentication/keytab/spnego.krb5.keytab
Key table: /QIBM/UserData/OS400/NetworkAuthentication/keytab/spnego.krb5.keytab
Principal: HTTP/rch730b.711.lab@711.LAB
Key version: 4
Key type: 256-bit AES
Entry timestamp: 1969/12/31-18:00:00
Principal: HTTP/rch730b.711.lab@711.LAB
Key version: 5
Key type: 128-bit AES
Entry timestamp: 1969/12/31-18:00:00
$
Test EIM Mapping
The following information describes how to test an EIM mapping. Use the Enterprise Identity Mapping tasks in System i Navigator to test a mapping.
|
IBM i system |
RCH730B.711.LAB |
|
EIM domain name |
eim |
|
Parent distinguished name |
None |
|
EIM domain controller (LDAP server) |
RCH730B.711.LAB |
|
EIM domain controller port |
389 |
|
LDAP administrator distinguished name |
cn=administrator |
|
LDAP administrator password |
secret |
|
Windows domain EIM registry (Windows domain) (Realm name) |
711.LAB |
|
Windows domain user account |
toms |
|
IBM i EIM registry (IBM i system) |
RCH730B.711.LAB |
|
IBM i user profile |
TSMITH |
Sample values from example environment used in the test EIM mapping task
Testing an EIM mapping consists of the following steps:
1. Use System i Navigator to access IBM i system settings
2. Add the IBM i system to the list of connections if necessary (for example, add RCH730B.711.LAB to My Connections if it is not already listed)
3. Select the IBM i system in the list of connections
4. Sign on using a user profile with *ALLOBJ special authority
5. Expand the IBM i system in the list of connections
6. Select Network > Enterprise Identity Mapping > Domain Management
7. Add the EIM domain to the list of domains if it is not listed
a. Select Add a domain from the Enterprise Identity Mapping tasks window
b. Specify the EIM domain name in the Domain field (for example, specify Eim)
c. Specify the parent distinguished name of the EIM domain within the directory in the Parent DN field (for example, specify None)
d. Specify the name of the EIM domain controller in the Domain controller field (for example, specify RCH730B.711.LAB)
e. Clear the Use secure connection (SSL or TLS) option
f. Specify the EIM domain controller port in the Port field (for example, specify 389)
g. Select OK
8. Expand Domain Management
9. Select the EIM domain (for example, select Eim)
10. Specify the credentials for connecting to the EIM domain controller in the Connect to EIM Domain Controller window
a. Select Distinguished name in the User type field
b. Specify the LDAP administrator distinguished name in the Distinguished name field (for example, specify cn=administrator)
c. Select the Specify password option and specify the LDAP administrator password in the input field (for example, specify secret)
d. Select OK
11. Select Test an EIM mapping from the Enterprise Identity Mapping tasks window
12. Specify the credentials for connecting to the EIM domain controller in the Connect to EIM Domain Controller window
a. Select Distinguished name in the User type field
b. Specify the LDAP administrator distinguished name in the Distinguished name field (for example, specify cn=administrator)
c. Select the Specify password option and specify the LDAP administrator password in the input field (for example, specify secret)
d. Select OK
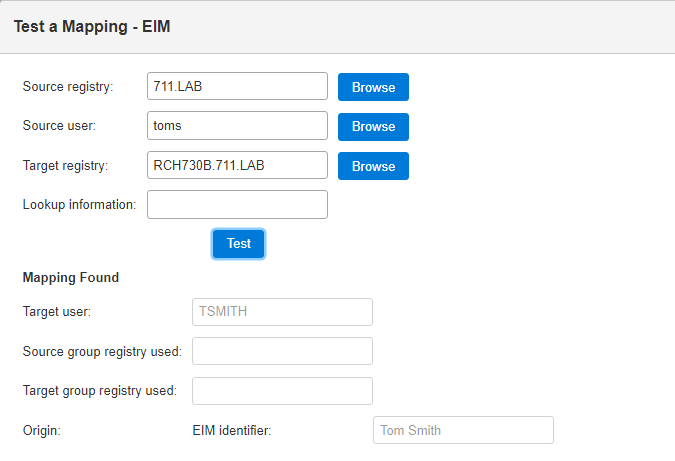
13. Specify the information for the EIM mapping in the Test a Mapping window
a. Specify the name of the EIM registry representing the Windows domain in the Source registry field (for example, specify 711.LAB)
b. Specify the Windows domain user account in the Source user field (for example, specify toms)
c. Specify the name of the EIM registry representing the IBM i system in the Registry field (for example, specify RCH730B.711.LAB)
d. Select Test
14. Review the results of the test in the Mapping found box of the Test a Mapping window
a. The IBM i user profile is displayed in the Target user field (for example, TSMITH is displayed)
b. Other information specifying how the mapping was resolved is displayed in the other fields
15. Select Close
Testing the SPNEGO is working for WebSphere Application Server can be done using:
http://rch730b.711.lab:27605/snoop
Enable Diagnostic Trace for SPNEGO
The following information describes how to enable diagnostic tracing for SPNEGO in a SPNEGO-enabled WebSphere Application Server profile. Use the WebSphere Integrated Solutions Console to enable diagnostic tracing for SPENGO. This task assumes the WebSphere Application Server profile was secured using Microsoft Active Directory as a stand-alone LDAP registry. This task assumes you are logged on to a workstation in the Windows domain using the Windows domain user account specified as the primary administrative user for the WebSphere Application Server profile.
This task assumes the URL for the WebSphere Integrated Solutions Console has been added to the trusted sites if using Internet Explorer.
This task assumes the WebSphere Application Server profile is already running.
|
WebSphere Integrated Solutions Console URL |
https://RCH730B.711.LAB:27608/ibm/console/ |
|
Application server |
WAS85GBM01 |
Sample values from example environment used in the secure profile task
Enabling diagnostic tracing for SPNEGO in a SPNEGO-enabled WebSphere Application Server profile consists of the following steps:
1. Open a browser window
2. Specify the URL to the WebSphere Integrated Solutions Console for the profile (for example, specify https://RCH730B.711.LAB:27608/ibm/console/)
3. Accept the site's security certificate if a warning is displayed indicating the certificate cannot be verified or is not trusted.
4. Select Servers > Server Types > WebSphere application servers in the list of tasks
5. Select your application server from the Application servers list (for example, select WAS85GBM01)
6. Select Java and Process Management > Process Definition under Server Infrastructure
7. Select Java Virtual Machine under Additional Properties
8. Select Custom Properties under Additional Properties
9. Select com.ibm.security.krb5.Krb5Debug in the list of properties (if the property does not exist, select New to create it)
10. Verify com.ibm.security.krb5.Krb5Debug is specified in the Name field
11. Specify all in the Value field
12. Select OK
13. Select com.ibm.security.jgss.debug in the list of properties (if the property does not exist, select New to create it)
14. Verify com.ibm.security.jgss.debug is specified in the Name field
15. Specify all in the Value field
16. Select OK
17. Select Save in the Messages box at the top of the page to save the changes
18. Select Troubleshooting > Logs and trace in the list of tasks
19. Select your application server from the list (for example, select WAS85GBM01)
20. Select Diagnostic Trace under General Properties
21. Select Change Log Detail Levels under Additional Properties
22. Select Components if it is not already selected
23. Expand * [All Components] > com.ibm.ws.*
24. Select com.ibm.ws.security.*
25. Select All Messages and Traces
26. Select OK
27. Select Save in the Messages box at the top of the page to save the changes
28. Restart the WebSphere Application Server profile to enable the changes
Was this topic helpful?
Document Information
Modified date:
11 December 2023
UID
ibm17044912