Question & Answer
Question
How do you configure different impersonation settings for different applications running on the same agent in IBM UrbanCode Deploy?
Cause
You have a shared target machine where one agent called MyAgent runs deployments for two applications called AppA and AppB.
UserA configures a process for deployment of AppA using impersonation on the target machine by impersonating user called sudoerA.
UserB configures a process for deployment of AppB using impersonation on the target machine by impersonating user called sudoerB.
You would like to prevent a situation in which UserA deploys AppA using impersonation and user sudoerB, which could cause problems when you run AppB.
Answer
ANSWER
The best way to avoid this situation is to control impersonation at as high a level as possible by creating two types of resources: Standard Resources and Agent Resources.
That way, you will ensure that Agents can be edited only by some administrator, not by developers, you will create an Agent Resource for each Application inside the Agent, and you will secure the Agent Resource so that only some administrators can edit them.
Also, you will create Standard Resources inside the Agent Resources that developers can write to, so that developers can add Components to the Standard Resources, but cannot change the impersonation.
Here is a sample configuration:
Create the Resource Tree
- Select Resources
- Click on : Create Top-Level Group
- Call it SIT
- Click on Actions > Add Agent
- Give it a name, in this example: MyAgent
- Select the Agent and click on Actions > Add Group
- Call the Group: ResourceForAppA (it looks like a folder)
- Select ResourceForAppA and click on Actions > Add Group
- Call the Group: Components
- Add your components under the group
- Repeat steps 7-10 for the Resource Group called ResourceForAppB, as in the following example:

Configure Security: Types and teams
- Open Settings > Security > Type Configuration > Resource
- Click on Create Type, and call the new type AgentResource

- Select Settings > Security > Teams
- Click on Create a new Team, called TeamA and add some users
- Look at the Team Object Mapping section and select:
View: Resource
Type: AgentResource
and click on Add
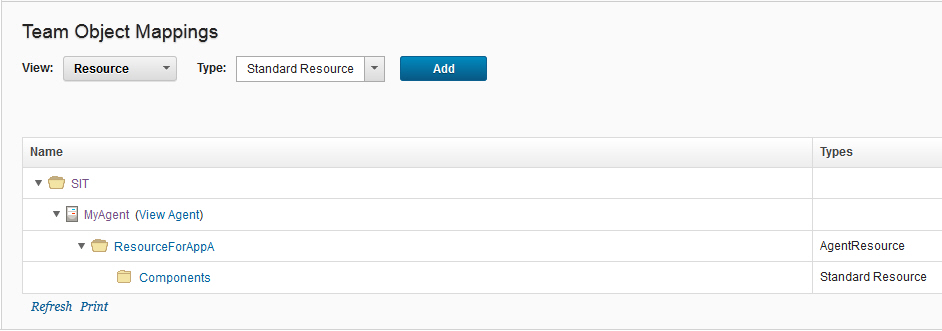
In the dialog that opens, select the AgentResource: SIT/MyAgent/ResourceForAppA

- Check the Team Object Mapping section and select:
View: Resource
Type: Standard Resource
and click on Add
In the dialog that opens, select the Resource Group: SIT/MyAgent/ResourceForAppA/Components
At the end the Team Object Mappings look like this:

- Repeat the steps 4-6 for a new Team called TeamB, that you associate with ResourceForAppB and ResourceForAppB\Components
Configure security for the Developer Role
- Add a new Role called Developer under Settings > Security > Role Configuration
- Select Resource. You should see Standard Resource and AgentResource
- Select these rights for Standard Resource: Create, Edit, View
- Select these rights for AgentResource: View

Because the Agent resource is added to the team as an AgentResource type, any user in the Developer role on the Team will only be able to view the Agent, and cannot change or override impersonation settings. However, these users still have access to manage any resources inside the Components Resource Group, because the Components resource is added to the team as a Standard Resource. - Select Agent
- Check the View permission for the Standard Agent type
This means that users in the Developer Role cannot edit the Agent.

Add Users to Teams, with the Developer Role
- Select Settings > Security > Teams > TeamA
- Add the User UserA to the Developer Role

- Repeat the steps 1-2 for the User UserB in Team TeamB.
Configure Security on the AgentResource
- Select Resources > ResourceForAppA and click on Edit
- Verify that you the Team called TeamA(as Agent Resource) was already added
- De-select Inherit Teams from Parent if it is not added and then add it
- Select Default Impersonation and select a user sudoerA
- Select the box: Always Use Default Impersonation.
This ensures that no users can use any other impersonation settings at a lower level or in a Step.

- Repeat the steps 1-5 for the AgentResource ResourceForAppB, using as Team TeamB (as AgentResource) and as impersonating user sudoerB.
Configure Security on the Resource Group (Standard Resource)
- Select Resources > SIT/MyAgent/ResourceForaAppA/Components
- Verify that the Team called TeamA is already added (as Standard Resource)
- Deselect Inherit Teams From Parent if it is not added and then add it.

- Leave Default Impersonation de-selected
Results:
- UserA in TeamA, having the Developer Role, can add Components to SIT/MyAgent/ResourceForAppA/Components, but cannot change the impersonation settings that are inherited from SIT/MyAgent/ResourceForAppA. As a result, all UserA's deployments will be run by user sudoerA.
AND - UserB in TeamB, having the Developer Role, can add Components to SIT/MyAgent/ResourceForAppB/Components, but cannot change the impersonation settings that are inherited from SIT/MyAgent/ResourceForAppB. As a result, all UserB's deployments will be run by user sudoerB.
Was this topic helpful?
Document Information
Modified date:
17 June 2018
UID
swg21659915