How To
Summary
Customer would like to configure their Controller system so that all (DB2) database network communication ("in transit") is encrypted (via TLS).
Objective
Environment
Controller databases hosted on DB2 database server.
- TIP: For the steps required for other database platforms (MS SQL, Oracle) see separate IBM Technotes (links below).
Steps
NOTES:
- The following steps are based on Controller 10.3.1 (installed in the default location) and DB2 11.1.
- For other/different versions (or if installed in non-default locations) , the instructions may need to be modified slightly.
- Naturally all changes should be done during a period of downtime (no users on the system).
- Ensure the FQDN (for example myserver1.companyname.com, not the NetBIOS name myserver1) of the DB2 server machine is used in all places
- If you are forcing the system to use TLS 1.2 (not the default TLS 1.0) the you will also need to perform the steps inside separate Technote #883036.
PART ONE - Test without encryption
Make sure that everything is working (in Controller) using the default unencrypted settings.
- In other words, do not proceed until you are sure that everything is working OK without TLS.
PART TWO - Configure DB2 server to use a TLS![]() certificate
certificate
PART THREE - Configure DB2 client to use encryption (via the DB2 GSKit)
- This must be done both on the Controller application server and also on the Cognos Analyics (BI) report server too
- TIP: For instructions, see link at the end of this Technote.
- the DB2 server is configured to communicate securely over port: 50001
- the DB2 keystore location is: E:\db2keystore\mykeystore2.p12
- the DB2 keystore stash file location is: E:\db2keystore\mykeystore2.sth
- the DB2 keystore was imported into a Java Key Store (JKS) located at: E:\db2keystore\keystore.jks
PART FOUR - Configure Cognos Analytics (Content Manager) to use encryption
For instructions, see Cognos Analytics documentation such as "Using SSL for database connections in IBM Cognos Configuration for an IBM Db2, Informix® database" (link at the end of this Technote).
On your Controller application server convert the UDL to use encryption by:
1. Browse to your UDL files
- TIP: By default, these are located here: C:\Program Files\ibm\cognos\ccr_64\data
2. Then open the relevant UDL file (for example 'test.udl') in NOTEPAD.EXE
3. Add the following text (which allows .NET components to use SSL):
Security=SSL;SSLClientKeystoredb={keystoreLocation};SSLClientKeystash={KeyStoreStashFileLocation}
4. Add the following text (which database conversion to work):
ccrSSLClientKeystoredb={JKSFileLocation};ccrSSLClientKeystorePassword={JKSFilePassword}
For example, the finished UDL file might look similar to:
-------------------------------------------------------
; Everything after this line is an OLE DB initstring
Location=rodb2encrypt:50001;Persist Security Info=True;Data Source=CCR01;Password=MyPassword;User ID=fastnet;Provider=IBMDADB2.DB2COPY1;Security=SSL;SSLClientKeystoredb=E:\db2keystore\mykeystore2.p12;SSLClientKeystash=E:\db2keystore\mykeystore2.sth;ccrSSLClientKeystoredb=E:\\db2keystore\\keystore.jks;ccrSSLClientKeystorePassword=changeit
-------------------------------------------------------
IMPORTANT: If you make any changes inside 'Database Connections' (inside Controller Configuration) then these manul edits (customisations) will be lost! Therefore you must remember to manually edit the UDL file after any future change you make inside 'Database Connections'.
NOTE: If using Controller 10.3.1 then (inside Controller Configuration) if you click on the tick ("check connection") button then the connection will show a failure.
- However, if using a later version of Controller (for example 10.4.1) then it will show success.
On your Controller application server:
1. Locate the file: ccr-dbTypes.properties
- By default this is located here: C:\Program Files\ibm\cognos\ccr_64\server\integration)
- As a precaution, create a backup of the file
- Use NOTEPAD to edit the file, and add the following lines at the end:
DB2.name = DB2
DB2.driver = com.ibm.db2.jcc.DB2Driver
DB2.url = jdbc:db2://%s%s/%s:sslConnection=true;sslTrustStoreLocation={JKSLocation};sslTrustStorePassword={JKSPassword};
NOTE:
- Replace JavaKeyStoreLocation with the location of the Java keystore containing the DB2 certificate
- This must be double escaped, for example: C:\\javaKeystore.jks
- Replace JavaKeyStorePassword with the password of the respective keystore.
2. Restart the Windows service 'IBM Cognos Controller Java Proxy'
PART SEVEN - Controller Web
The 'SyncDB' utility (see Technote 289719) will only create unencrypted entries (inside datasources.xml). Therefore after using that utility you must always remember to manually re-edit it.
There are two methods you can use to configure encryption for Controller Web:
Method #1 - Add the DB2 certificate to the keystore holding the private key that allows Webpshere to expose the services via HTTPS
- NOTE: If you re-run the SyncDB utility, then this will overwrite this parameter (so you will need to repeat the change)
- ensure the following is enabled (not commented): <feature>ssl-1.0</feature>
- ensure that the keystore is defined, for example: <keyStore id="defaultKeyStore" password="changeit" />
Method #2
- sslConnection="true"
- sslTrustStoreLocation="{JKSLocation}"
- sslTrustStorePassword="{JKSPassword}"/>
<dataSource id="DB2_Encrypt" jdbcDriverRef="db2" jndiName="jdbc/DB2_Encrypt" type="javax.sql.DataSource">
<properties.db2.jcc databaseName="CCR01" deferPrepares="false" password="MyPassword" portNumber="50001" serverName="MYDB2ENCRYPT" user="fastnet" sslConnection="true" sslTrustStoreLocation="E:\db2keystore\keystore.jks" sslTrustStorePassword="changeit"/>
</dataSource>
PART EIGHT - ODBC (Consolidations, optimisations)

- Open a command prompt as administrator
- type the command: db2cmd
- In the DB2 Command window (that has opened) type commands similar to the following:
update dbm cfg using SSL_CLNT_STASH {PATH_TO_STASH_FILE }
Update dbm cfg using SSL_CLNT_KEYDB E:\db2keystore\mykeystore2.p12
Update dbm cfg using SSL_CLNT_STASH E:\db2keystore\mykeystore2.sth
db2 catalog db {Controller_DB2_database} as {Alias} at node {nodeName}
db2 catalog tcpip node SSLNODE remote mydb2encrypt server 50001 security ssl
db2 catalog database CCR01 as CCR01SSL at node SSLNODE
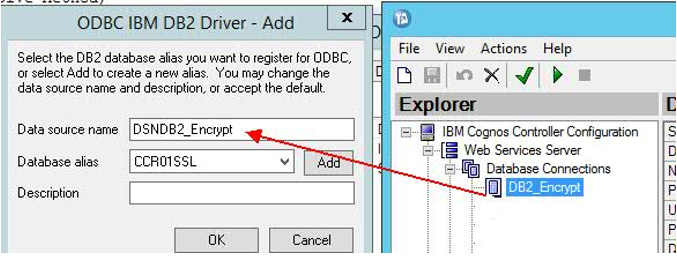
- Choose the DB2 ODBC driver
- Configure the name as: DSN{UDLName}
- Create one for each and every alias (previously created), for example:
- Click Configure
- Open tab: Advanced Setting
- Add the following parameters:
- Patch1 = 1024
- MapDecimalFloatDescribe = SQL_C_DOUBLE ( 3 )
- Click Apply
- Click OK.
PART NINE - Standard Reports
On your Cognos Analytics server, perform similar tasks to what you did earlier on the Controller application server:
- Open a command prompt as administrator
- type the command: db2cmd
- In the DB2 Command window (that has opened) type commands similar to the following:
update dbm cfg using SSL_CLNT_STASH {PATH_TO_STASH_FILE }
Update dbm cfg using SSL_CLNT_KEYDB E:\db2keystore\mykeystore2.p12
Update dbm cfg using SSL_CLNT_STASH E:\db2keystore\mykeystore2.sth
db2 catalog db {Controller_DB2_database} as {Alias} at node {nodeName}
db2 catalog tcpip node SSLNODE remote mydb2encrypt server 50001 security ssl
db2 catalog database CCR01 as CCR01SSL at node SSLNODE
Then modify the connection string for each Controller database by doing the following:
3. Launch the CA website, locate the relevant data source
4. Edit it
5. Remove the existing DB2 Connection String and put the Alias (used to map the Controller database through a node configured with SSL) in the DB2 database name
Before:

After:

PART TEN - FAP Server
If using FAP, then you must also perform the following:
1. On the Controller application server (where the Windows service 'IBM Cognos FAP Service' is running), browse to here: C:\Program Files\IBM\cognos\ccr_64\server\FAP\
2. Edit this file in NOTEPAD: FAPService.properties
3. To enable secure connection to the FAP database, add a line similar to:
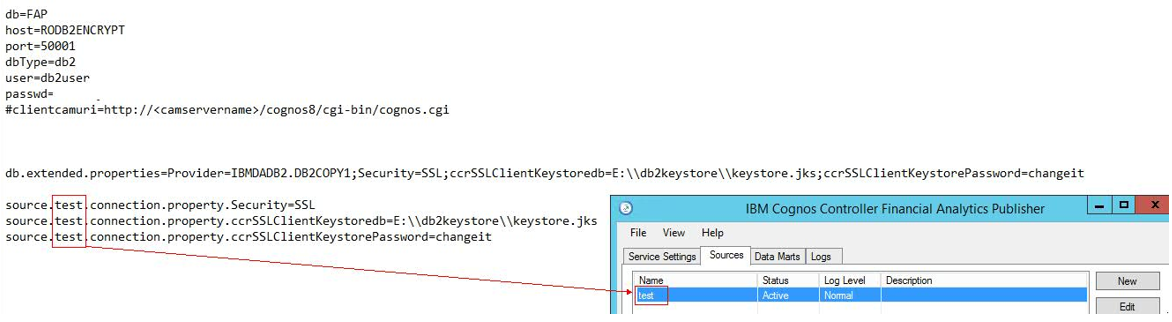
db.extended.properties=Provider=IBMDADB2.DB2COPY1;Security=SSL;ccrSSLClientKeystoredb={JKSLocation};ccrSSLClientKeystorePassword={JKSPassword}
4. Also, add a line for each and every one of your FAP sources, similar to:
source.test.connection.property.ccrSSLClientKeystoredb={JKSLocation}
source.test.connection.property.ccrSSLClientKeystorePassword={JKSPassword}
For example:
PART ELEVEN - FAP Client
1. On every device that is using the FAP client, you will need to modify the DB2 client (in a similar way to described above).
2. Launch the FAP client
3. In the Server field, after the Server name add the TCP port (onto which DB2 is listening for encrypted connections) preceded by a colon
4. In the Database field add the following parameters (leave the first semicolon as in the caption below)
Security=SSL;SSLClientKeystoredb={DB2_p12_certificate_location};SSLClientKeystash={P12_Stash_File_location}
NOTE:
- If using Controller 10.3.1 then you add the above after the database name, for example:
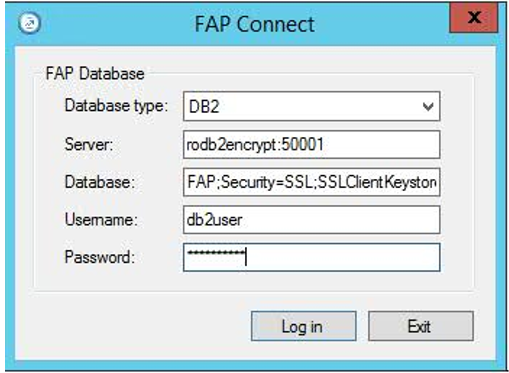
- However, if using Controller 10.4.0 (or later) then use the separate field (where the encryption parameters can be put, without the need to append them to the database field)
- Highlight the relevant source
- Click 'Edit'
- Modify the value for 'port' to use similar settings as chosen above (in steps 4 and 5), for example:
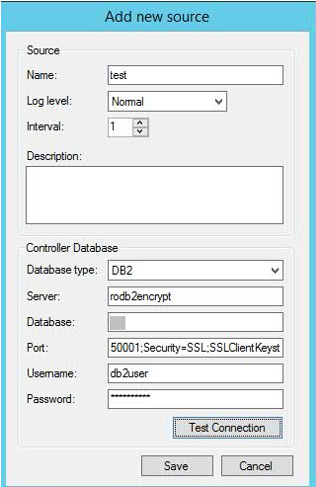
- If using Controller 10.3.1, then (after adding this new parameter and closing the window) this new/additional parameter will be saved in the database. HOWEVER, the new parameter will not be visible when the window is opened a second time! This is a known limitation in Controller 10.3.1
- If using Controller 10.4.0 (or later) then this limitation is no longer present: the encryption parameters can be put in a separate field and will be visible when the window is re-opened.
PART TWELVE - Planning Analytics (TM1) server
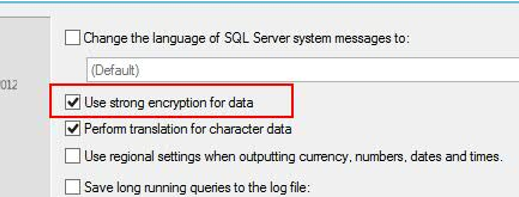
1. On the PA server, edit the ODBC connection 'FAP'
2. Tick the option 'Use Strong Encryption for Data':
-Dcom.ibm.jsse2.overrideDefaultProtocol=TLSv12
Additional Information
Related Information
737041 - MS SQL - How to configure Controller to use TLS (formerly SSL) to conn…
6323569 - Oracle - How to configure Controller to use TLS (formerly SSL) to con…
DB2 GSKit - IBM Security Directory Server 6.4.0 - Installing GSKit on Windows
Cognos Analytics 11.1 - Using SSL for database connections in IBM Cognos Config…
Document Location
Worldwide
Was this topic helpful?
Document Information
Modified date:
27 August 2020
UID
ibm16323587