How To
Summary
How to connect and manage a Power10 eBMC type system from an HMC.
Objective
This document helps to get the Power 10 eBMC system managed by the HMC.
Environment
HMC 7063 model type - V10R1M1020 or higher
vHMC on x86 - V10R1M1020 or higher
vHMC on Power - V10R1M1020 or higher
Power 10 eBMC type system
MT: 9105, 9028, 9043 or 9786
Steps
Background
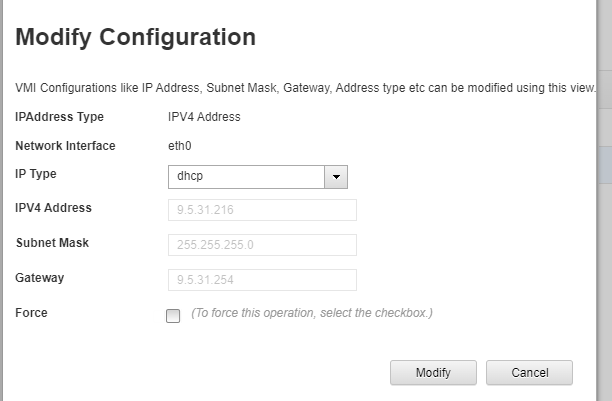
eBMC Power servers introduce a new connection type between HMC and managed server. Each eBMC server requires two connections; one to the eBMC itself and one to the Virtual Management Interface (VMI). This requires two IP addresses per eBMC Ethernet port. As with FSP-based systems there are two eBMC Ethernet ports to allow for redundant HMCs. Each HMC is cabled (private DHCP networks) or connected via static IP address to one eBMC port. Redundant HMCs require a total of 4 IP addresses for each server. The default setting for the eBMC IP address is dhcp client, however the default setting for the VMI IP address is currently set to static. The VMI IP settings should be configured before powering on or the server will go into a no connection state when it reaches standby. The eBMC IP address is active when the server has completed AC power apply initialization (power off state). The VMI IP address is not active until the server is powered on (standby or operating).
** There are no default IP addresses anymore, to access ASM using a browser. You should use panel function 30 to what the IP address may be set to. Panel Function 30
Example of 9105-22A, 9105-22B, or 9786-22H rack rear view where eBMC ports are in yellow, (T0=Port0, T1=Port1)

Prerequisites
1. HMC must be at V10R1M1020 (V10R1) or higher or V10R2M1030 (V10R2) or higher
2. If the Power10 has FW1050, then the HMC MUST be running V10R3M1050 or higher
3. If the Power10 has FW1060, then the HMC MUST be running V10R3M1060 or higher
Steps
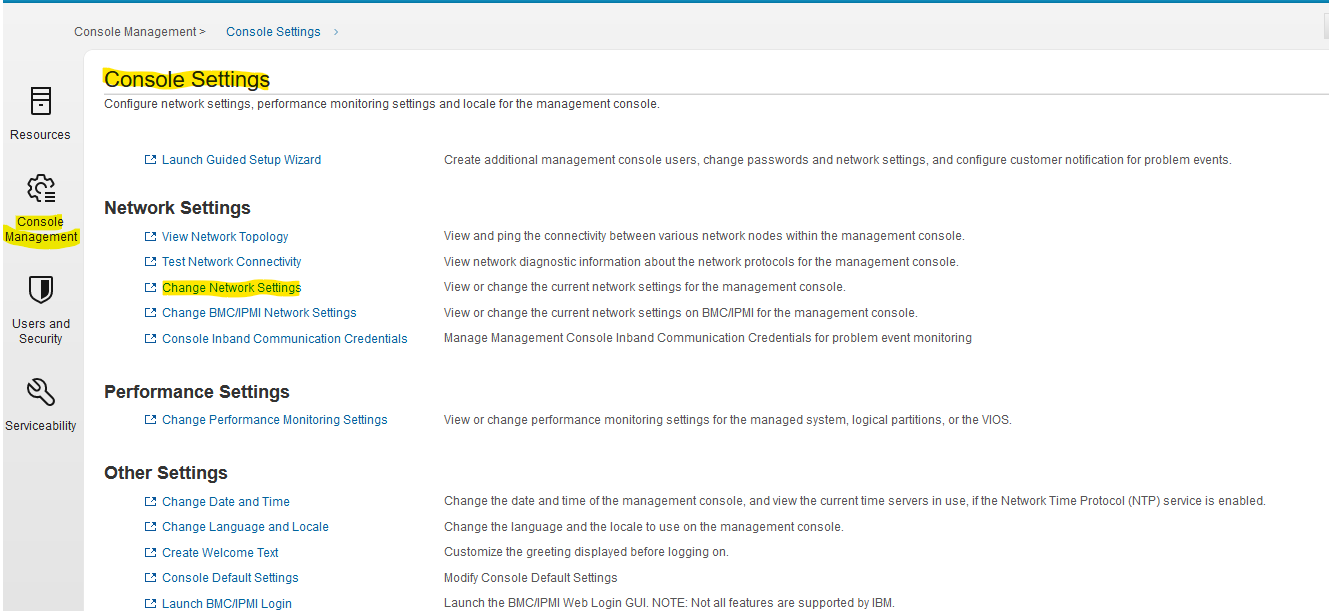
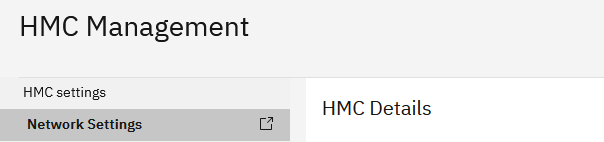
1. First configure the HMC network settings. (You can use DHCP or Static) In this example below, we are using DHCP.
Note which release your running, V10R1, V10R2 or V10R3 and follow the correct paths. Click the release...
*************************************************************************************
*************************************************************************************
Then select LAN adapters, highlight an adapter to use (eth1 for example), and click Details.
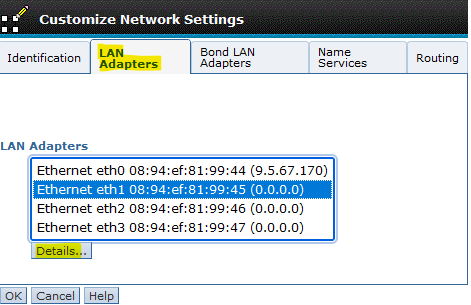
Select Private, Media Speed *Autodetection, check the box for Enable DHCP server, then pick a range to use. Then click OK
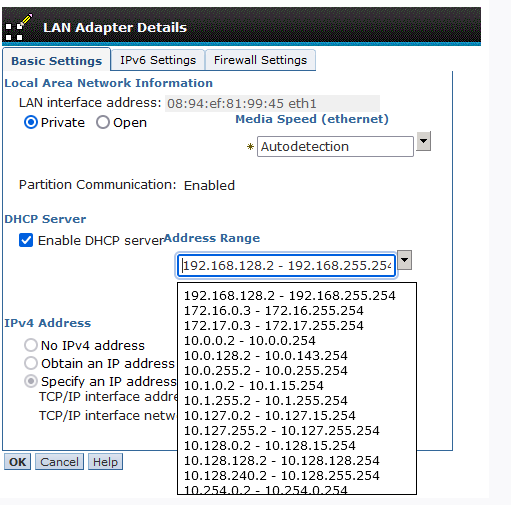
Click OK again to Update Network Settings.
**********************************************************************************************************


Select the adapter to use, and click the edit option on the right side.

On this screen above, use the drop down arrow for adapter range and select one. Make sure that the box is checked for Enabled DHCP Server.
(If your using Static IP address, then set Group Label to Open, uncheck Enabled DHCP Server, and enter the IPv4 address under Specify an IP address.)
Be sure to click SAVE button on the bottom right. Save again to save network settings.
**********************************************************************************************************
2. Cable the port selected on the HMC to an eBMC port on the Power 10.
**Note - If using Static IP address, you must access the eBMC port on the Power10 using a laptop, to set the static IP address to be used. See - Connecting a laptop to eBMC interface
Once that is done, then use the screens above to set an Open connection, using Specify an IP address, (static) an put in your IP address of the HMC, that will connect to the one set in eBMC.
Note the eBMC port used on the Power 10 system (first (T0) HMC port = eth0, second (T1)HMC port = eth1)
Procedure
| 1. Be at least 8 characters 2. Not be a palindrome |
3. Not contain the account username 4. Not contain a dictionary word |
5. Not contain sequential characters 6. Must be 20 characters or less if used for IPMI |

For V10R3M1060 -

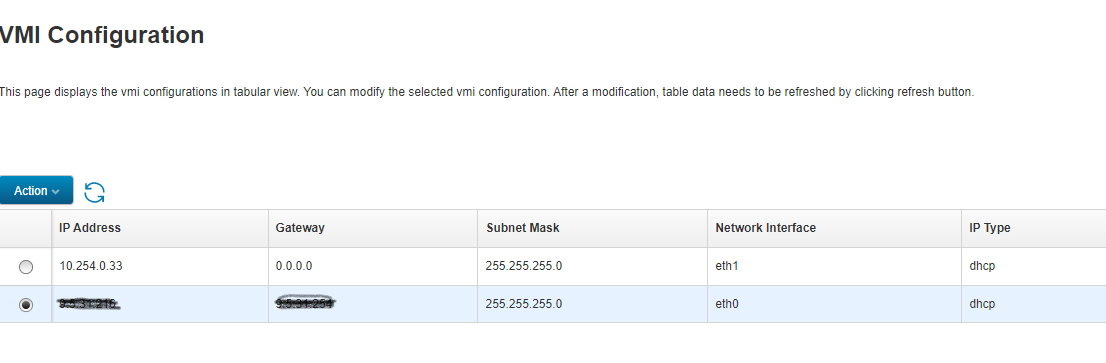
The table view will show an icon that looks like this for the Power 10

Document Location
Worldwide
[{"Line of Business":{"code":"LOB08","label":"Cognitive Systems"},"Business Unit":{"code":"BU054","label":"Systems w\/TPS"},"Product":{"code":"SSOQ2E","label":"Hardware Management Console V10"},"ARM Category":[{"code":"a8m0z000000bowEAAQ","label":"Hardware Management Console"}],"Platform":[{"code":"PF025","label":"Platform Independent"}],"Version":"10.1.0","Type":"MASTER"},{"Line of Business":{"code":"LOB68","label":"Power HW"},"Business Unit":{"code":"BU070","label":"IBM Infrastructure"},"Product":{"code":"SSZ0S2","label":"IBM Power S1014 (9105-41B)"},"ARM Category":[{"code":"a8m3p000000F98NAAS","label":"eBMC-\u003EOn Power10"}],"Platform":[{"code":"PF025","label":"Platform Independent"}],"Version":"All Versions","Type":"MASTER"},{"Line of Business":{"code":"LOB68","label":"Power HW"},"Business Unit":{"code":"BU070","label":"IBM Infrastructure"},"Product":{"code":"SSE1FSG","label":"IBM Power S1022 (9105-22A)"},"ARM Category":[{"code":"a8m3p000000F98NAAS","label":"eBMC-\u003EOn Power10"}],"Platform":[{"code":"PF025","label":"Platform Independent"}],"Version":"All Versions","Type":"MASTER"},{"Line of Business":{"code":"LOB68","label":"Power HW"},"Business Unit":{"code":"BU070","label":"IBM Infrastructure"},"Product":{"code":"SST50ER","label":"IBM Power S1022s (9105-22B)"},"ARM Category":[{"code":"a8m3p000000F98NAAS","label":"eBMC-\u003EOn Power10"}],"Platform":[{"code":"PF025","label":"Platform Independent"}],"Version":"All Versions","Type":"MASTER"},{"Line of Business":{"code":"LOB68","label":"Power HW"},"Business Unit":{"code":"BU070","label":"IBM Infrastructure"},"Product":{"code":"SSBPSUB","label":"IBM Power S1024 (9105-42A)"},"ARM Category":[{"code":"a8m3p000000F98NAAS","label":"eBMC-\u003EOn Power10"}],"Platform":[{"code":"PF025","label":"Platform Independent"}],"Version":"All Versions","Type":"MASTER"},{"Line of Business":{"code":"LOB68","label":"Power HW"},"Business Unit":{"code":"BU070","label":"IBM Infrastructure"},"Product":{"code":"SSHW1P","label":"IBM Power System S1012 (9028-21B)"},"ARM Category":[{"code":"a8m3p000000F98NAAS","label":"eBMC-\u003EOn Power10"}],"Platform":[{"code":"PF025","label":"Platform Independent"}],"Version":"All Versions","Type":"MASTER"},{"Line of Business":{"code":"LOB68","label":"Power HW"},"Business Unit":{"code":"BU070","label":"IBM Infrastructure"},"Product":{"code":"SSMI4EA","label":"IBM Power E1050 (9043-MRX)"},"ARM Category":[{"code":"a8m3p000000F98NAAS","label":"eBMC-\u003EOn Power10"}],"Platform":[{"code":"PF025","label":"Platform Independent"}],"Version":"All Versions","Type":"MASTER"},{"Type":"MASTER","Line of Business":{"code":"LOB68","label":"Power HW"},"Business Unit":{"code":"BU070","label":"IBM Infrastructure"},"Product":{"code":"SSM8OVD","label":"IBM Power L1022 (9786-22H)"},"ARM Category":[{"code":"a8m3p000000F98NAAS","label":"eBMC-\u003EOn Power10"}],"Platform":[{"code":"PF025","label":"Platform Independent"}],"Version":"All Versions"},{"Type":"MASTER","Line of Business":{"code":"LOB68","label":"Power HW"},"Business Unit":{"code":"BU070","label":"IBM Infrastructure"},"Product":{"code":"SSZY7N","label":"IBM Power L1024 (9786-42H)"},"ARM Category":[{"code":"a8m3p000000F98NAAS","label":"eBMC-\u003EOn Power10"}],"Platform":[{"code":"PF025","label":"Platform Independent"}],"Version":"All Versions"}]
Was this topic helpful?
Document Information
More support for:
Hardware Management Console V10
Component:
Hardware Management Console
Software version:
10.1.0
Document number:
6833430
Modified date:
27 January 2025
UID
ibm16833430
Manage My Notification Subscriptions