How To
Summary
You can log in to the WebSphere admin console by using an OIDC provider instead of the WebSphere registry. You can do this by protecting your console with the OpenID Connect (OIDC) trust association interceptor (TAI).
Objective
By default, WebSphere administrators can log in to the administrative console with credentials from a configured repository, such as LDAP. Many companies are using single sign-on for all their applications, and administrators also want to use single sign-on to log in to their WebSphere administrative console. The OpenID Connect TAI can protect the console so that an administrator can log in to the console by using an OpenID provider, such as Open Liberty, Ping Identity, Okta, or Microsoft Azure Active Directory.
Considerations
When applications are protected in a single sign-on scenario, you are not challenged to log in to an identity provider more than once. Specifically, if two applications use the same identity provider, after you log in to one, then start the other in the same browser (such as another tab or window), you are not required to log in again.
Ordinarily, if you log out of one application, you are not logged out of the other. This behavior presents a good user experience that you might see when you use Google or Facebook to log in to applications in a browser.
When the WebSphere administrative console is protected with single sign-on, in this case OIDC, the console might not behave as you expect.
- Due to the behavior of single sign-on, you might gain access to the console without providing credentials at the time the console is started.
- The OpenID Connect provider (OP) is in control of when credentials are required, WebSphere is not.
- Some OPs leave information in the browser that keeps the user logged in to the OP to preserve the functions of SSO.
- The OpenID Connect provider (OP) is in control of when credentials are required, WebSphere is not.
- When you click logout, you might be redirected back to the console page.
- When you click logout on the console, it clears the LTPA cookie, then redirects to the logout exit page, which in turn displays the login page.
- However, when the console is protected with OIDC, the LTPA cookie is not in play. After the cookie is deleted, the console redirects to its exit page. The OIDC TAI intercepts the URL, sends it to the OP for authentication, who then doesn't ask for credentials.
- You can circumvent these behaviors by implementing RP-Initiated logout. However, RP-Initiated logout might present a negative user experience because users are not expecting to be logged out of all their applications when they log out of one.
- There are secure scenarios where RP-Initiated logout must be performed.
- You can choose to implement RP-Initiated logout for your console. If you don't, there are changes that you can make to console and core security settings to make the behavior a little more logical, without sacrificing the single sign-on functionality that you get by using your OpenID provider.
Steps
Perform the following steps to protect your WebSphere administrative console by using the OpenID Connect TAI:
-
Make sure that you are running the latest version of the OIDC TAI. See Obtaining WebSphere OpenID Connect (OIDC) latest version.
-
If you are running in a Network Deployment cell, perform the following actions:
-
Download the deployOidc.py script from the sample.wsadmin.websphere-traditional Github project.
-
On the DMgr, run the deployOidc.py script:
wsadmin -f deployOidc.py install  When you deploy the OIDC application as an admin app with deployOidc.py, the port that you configure in your callback URL on your OP is the admin port.
-
-
Configure the OIDC TAI. See Configuring an OpenID Connect Relying Party
-
Unless you plan to protect other applications with the TAI, do not perform step 1.
-
You installed the OIDC application as an admin app in the previous step.
-
-
Start with these settings:
 If provider_1 is already in use in your configuration, substitute provider_1 with a provider number that you are not using.
-
If your provider has a discovery endpoint:
-
Instead of hardcoding other URLs, set provider_1.discoveryEndpointUrl to your OP's discovery endpoint.
-
-
Set provider_1.filter to request-uri~=/ibm/console(?!/images/)(.*).*
- Do not set provider_1.signatureAlgorithm
- If your users are in the local registry:
- Set provider_1.mapIdentityToRegistryUser to true so that your SSO users get the groups from the registry.
- If your users and groups are not in the local registry:
- You need to perform the steps in WebSphere application security role mapping to external groups later.
- If you are running in a cluster:
- set provider_1.createSession to true
- Prevent race conditions:
- set provider_1.refreshExpiredAccessToken to true (default)
- set provider_1.refreshBeforeAccessTokenExpiresTime to 30
- set provider_1.sessionCacheTimeoutMinutes to 0
Note: If your OP sends an access token, but no refresh token, despite setting sessionCacheTimeoutMinutes to 0, you are required to re-login to your OP when your access token expires.
- The port for the redirect URI is the admin secure port.
- DO NOT set provider_1.useRealm to WAS_DEFAULT
- Map users to the WebSphere registry or configure your OP's realm as a trusted realm instead.
- If you use the useRealm property with the console, node synchronization might not work.
-
-
- (Optional) Configure RP-Initiated logout (requires 8.5.5.23 or 9.0.5.14 or later):
If you want to logout of the OpenID Connect provider when you click logout on the console, follow the instructions on Configuring the OIDC TAI to perform RP-initiated logout.
Further console tuning to avoid user experience issues
- When the console times out, it reverts to its own login screen that requires WebSphere registry credentials. Prompting for WebSphere registry credentials is not desirable in a single sign-in scenario. The only way to prevent this behavior is to disable console timeout:
- Follow the instructions at How do I disable the console timeout? in the administrative console troubleshooting guide.
 If you do not disable console timeout, if you don't set either the adminconsole.certLogin or adminconsole.ssoLogin JVM property to true as described in the next step, a WebSphere login panel displays when the console times out.
 - Sometimes when you log in to the console, you might see this page:
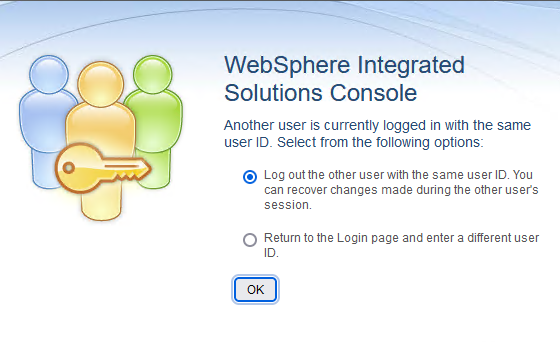
Unless you make a configuration change to the console, if you click the second radio button, Return to the Login page and enter a different user ID, the console presents its login page that requires WebSphere credentials. The only way to circumvent this behavior currently is to set a console custom property that is intended for a different login type: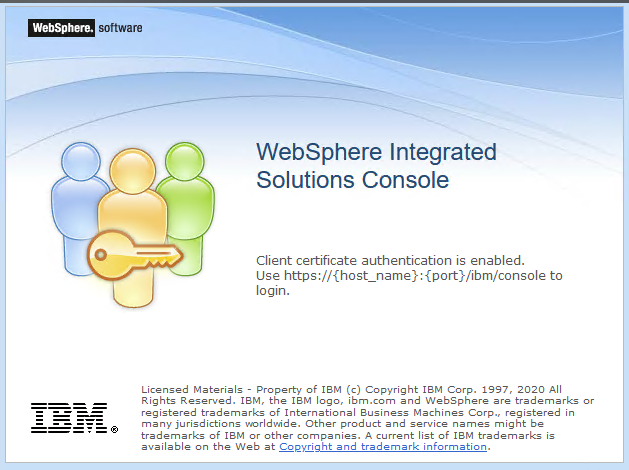
The "Client certificate..." sentence is inaccurate, but Use https://{host_name}:{port}/ibm/console is the correct action to take. In fix packs 8.5.5.25 and 9.0.5.18, a new custom property called adminconsole.ssoLogin is introduced that, when set to true, displays this message instead:
Use https://{host_name}:{port}/ibm/console to login. The application server is configured to use an alternate form of authentication. - Navigate to the JVM custom properties page in the administrative console. Perform one of the following actions:
- If you are running in a Network Deployment cell, click System administration > Deployment manager > Java and Process Management > Process definition > Java Virtual Machine > Custom properties
- Otherwise, click Servers > Server Types > WebSphere Application Servers > (serverName) > Expand Java and Process Management (under Server Infrastructure) > Process definition > Java Virtual Machine > Custom properties
- On the Custom properties page, click New.
- For fix packs 8.5.5.25 and 9.0.5.18 and later, set the name to (the name is case-sensitive):
- adminconsole.ssoLogin
- Otherwise, set the name to:
- adminconsole.certLogin
- Set Value to true.
- Click Apply and then Save to save the changes.
- Navigate to the JVM custom properties page in the administrative console. Perform one of the following actions:
- If you did not configure RP-Initiated logout and you set either the adminconsole.certLogin or adminconsole.ssoLogin properties to true, when you click logout in the console, the Client certificate authentication is enabled panel that is shown in the previous step displays. This panel can be confusing to users and can be circumvented by configuring the console with a logout exit page.
- Follow the steps at How do I change the console's logout exit page? on the administrative console troubleshooting guide.
Next steps
- If your users and groups are not in the local registry:
- Perform the steps in WebSphere application security role mapping to external groups.
- The WebSphereOIDCRP_Admin app that is installed by depolyOidc.py cannot be mapped to application servers.
- If you want to use the OIDC TAI to protect other applications in your cell, install the WebSphereOIDCRP.ear EAR file from the (WAS_HOME)/installableApps directory and map it to your application servers.
- The TAI configuration for your "normal" apps is combined with your admin console TAI config; you do not add another RelyingParty interceptor.
Troubleshooting
If you followed these steps then have problems logging into the console and you need to get into the console to fix the problems, you need to modify files so that you can login to the console with a user from the WebSphere registry. Perform the following steps:
- Stop the dMgr
- If you are having a problem with admin-authz.xml, also stop the node agents.
- Edit (WAS_HOME)/config/cells/(CELL_NAME)/security.xml
- Comment out com.ibm.ws.security.oidc.client.RelyingParty. This prevents the TAI from loading.
- For example, change com.ibm.ws.security.oidc.client.RelyingParty to Xcom.ibm.ws.security.oidc.client.RelyingParty
- Save the file
- Edit (WAS_HOME)/config/cells/(CELL_NAME)/nodes/(NODE_NAME)/servers/dmgr/server.xml
- Comment out adminconsole.ssoLogin. This allows the administrative console login screen to display.
- Save the file
- If you have an error in admin-authz.xml, edit (WAS_HOME)/config/cells/(CELL_NAME)/admin-authz.xml and comment out your changes.
- Save the file
- Restart the dMgr
- If you stopped your node agents because you made updates to admin-authz.xml, you'll need to restart your node agents two times to make sure that the node agent picks up your changes.
- Login to the console and make any changes required to fix your configuration
- Save the changes
- Logout of the administrative console.
- Stop the dMgr
- Edit the previous files and restore the changes that you made.
- Restart the dMgr
- If you stopped your node agents because you made updates to admin-authz.xml, you'll need to restart your node agents two times to make sure that the node agent picks up your changes.
- Retest the console
[{"Type":"MASTER","Line of Business":{"code":"LOB67","label":"IT Automation \u0026 App Modernization"},"Business Unit":{"code":"BU048","label":"IBM Software"},"Product":{"code":"SSEQTP","label":"WebSphere Application Server"},"ARM Category":[{"code":"a8m50000000Ccx5AAC","label":"WebSphere Application Server traditional-All Platforms-\u003ESecurity-\u003ESSO"}],"ARM Case Number":"","Platform":[{"code":"PF025","label":"Platform Independent"}],"Version":"All Versions"}]
Was this topic helpful?
Document Information
Modified date:
11 July 2024
UID
ibm17057023