How To
Summary
The purpose of this article is to help administrators to configure QRadar® NAT Groups when the Console must be reachable through a Public IP.
Environment
To configure this integration, the administrator must have:
- A NAT device in between translating the Public IP to the Private IP of the Console and vice-versa. The NAT configuration must be static one-to-one.
- The firewall devices involved in the connection must allow port 22 from the Console's Public IP to the managed hosts.
IMPORTANT: This technote assumes that all the managed hosts in the deployment have encryption enabled. If any of the managed hosts don't have encryption enabled, the firewall devices must grant the connection to all the ports from the Console's Public IP.
Steps
Note: The following IPs are only meant to illustrate the configuration. All of them are considered "Private IPs" by the RFC 1918. The administrator must change the IPs to match its deployment accordingly.
Deployment Overview
Console Private IP = 10.11.12.254
Console Public IP = 172.16.12.100
Console NAT Group (Location) = Main Office

Event Processor (EP) Private IP = 192.168.12.101
Event Processor (EP ) Public IP = 172.16.12.101
Event Processor (EP ) NAT Group (Location) = Branch1
Connectivity Verification and considerations
Note: Before enabling the network devices' configuration, it is strongly advised that the administrators test the implementation in a lab environment to avoid connectivity problems when implementing this on a production deployment.
QRadar® Configuration
- Navigate to the "Add Managed Host" menu.
- Log into QRadar Console as the admin user.
- On the navigation menu (
 ), click Admin.
 - In the System Configuration section, click System and License Management.
- In the Display list, select Systems.
- Create a NAT Group for the Console
- Select the QRadar Console appliance in the host table.
- On the Deployment Actions menu, click Edit Host.
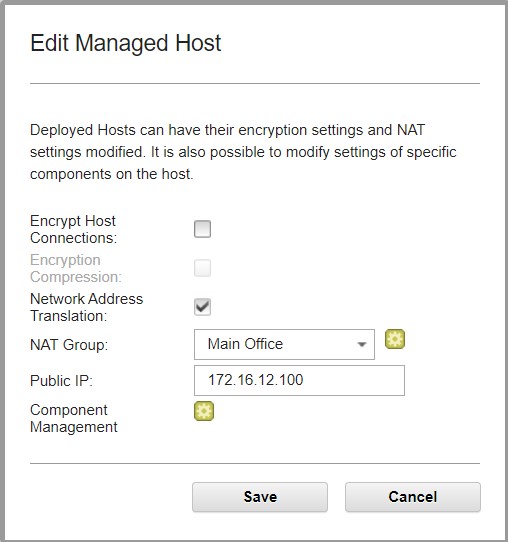
- Select the Network Address Translation check box.
- Click the settings icon (
 ) to create a new NAT group.
 - Click Add and create the NAT Group.
- Give the NAT Group a name and click on Save.
- Click Close to go back to the "Edit Managed Host" menu.
- Configure the Console to use the NAT Group.
- Select the Network Address Translation check box.
- In the NAT Group list, select the NAT group that the QRadar Console belongs to. In this technote example is "Main Office."
- In the Public IP field, type the Public IP address for the Console, and then click Save.
- Deploy the changes.
Result:
The Console will reconfigure the components on the managed hosts in the deployment to permit connections from the Console's Public IP.
The managed hosts will reach the Console using the Console's Public IP.
Related Information
Document Location
Worldwide
[{"Line of Business":{"code":"LOB24","label":"Security Software"},"Business Unit":{"code":"BU059","label":"IBM Software w\/o TPS"},"Product":{"code":"SSBQAC","label":"IBM Security QRadar SIEM"},"ARM Category":[{"code":"a8m0z000000cwtNAAQ","label":"Deployment"}],"ARM Case Number":"","Platform":[{"code":"PF016","label":"Linux"}],"Version":"All Version(s)"}]
Was this topic helpful?
Document Information
Modified date:
15 March 2021
UID
ibm16419463