IBM Support

Exploded views - IBM 3600 LTO Tape Library

Product Documentation


Abstract

This document contains a table entitled IBM 3600 LTO Tape Library - Exploded views

Content

The exploded views are categorized into the following sections. Move the mouse over the part for a description of the part.

Click here to review systems part listing for IBM 3600 LTO Tape Library

Front and back replacement part numbers (FRUs)
These parts are accessed from the front or back of the library
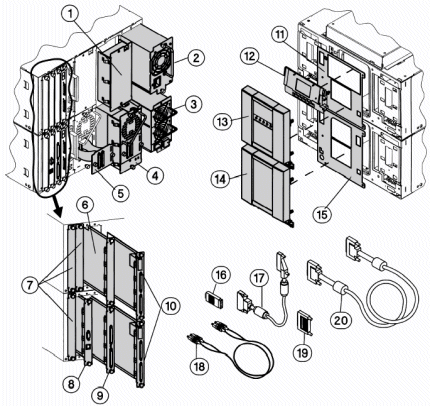
Exploded View of Front and Back FRUs Vacant drive module cover Standard power supply Redundant power supply Tape drive module Online drive repair SCSI loop cable Slave controller Vacant card slot cover Remote management card assembly Library controller Fibre Channel board RFI front panel display shield Front panel display Quartz gray display window frame and viewing window Quartz gray viewing window assembly RFI viewing window shield Fibre Channel GBIC External daisy-chain cable Fibre Channel cable SCSI terminator SCSI interface cable

Index Description

1

Vacant drive module cover

2

Standard power supply

3

Redundant power supply

4

Tape drive module

5

Online drive repair SCSI loop cable (included in cable kit)

6

Slave controller for all models, except Model 2/20

7

Vacant card slot cover

8

Remote management card assembly

9

Library controller

10

Fibre Channel board

11

RFI front panel display shield

12

Front panel display

13

Quartz gray display window frame and viewing window

14

Quartz gray viewing window assembly

15

RFI viewing window shield

16

Fibre Channel GBIC. Only used on standard performance Fibre Channel boards.

17

External daisy-chain cable

18

Fibre Channel cable

19

SCSI terminator

20

SCSI interface cable

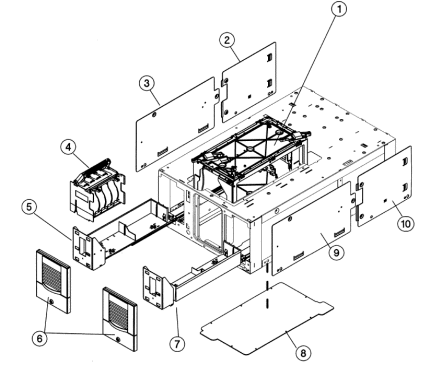
Cosmetic and sheetmetal replacement part numbers (FRUs)
These parts are accessed on the outside of the library

Cosmetic and sheetmetal FRUs

Index Description

1

Transport assembly

2

Library side panel for models 2/20, 4/40 (left back, when viewing from the front of the library)

3

Library side panel for models 2/20, 4/40, and 6/60 (left front, when viewing from the front of the library)

4

Empty magazine

5

Left door tray assembly

6

Left and right cosmetic door

7

Right door tray assembly

8

Bottom cover

9

Library side panel for Models 2/20, 4/40, and 6/60 (right front, when viewing from the front of the library)

10

Library side panel for Models 2/20, 4/40, and 6/60 (right back, when viewing from the front of the library).

Cosmetic and sheetmetal FRUs continued

Index Description

1

Library top cover for model 2/20

2

Bezel chin for the lowest library level

3

Forehead for library model 4/40

4

Bezel chin

5

Forehead for library models 6/60 and 12/140

6

Lifting strap (used to guide libraries into a rack)

7

Lifting strap (used to guide libraries into a rack)

8

Vertical lift cover for multi-level libraries

9

Standalone feet

10

Standalone feet

Internal replacement part numbers (FRUs)
This exploded view illustrates parts that are found inside the library.

Internal FRUs

Index Description

1

Back gear rail without stop for multi-level libraries. Install this part by removing all drives and installing the rails from the back of the library.

2

Front gear rail without stop for multi-level libraries. Install this part by removing the viewing window from the front of the library.

3

Back gear rail with stop (packaged with front and upper gear rails and accessed by removing the drives).

4

Front gear rail with stop (packaged with back and upper gear rails and accessed by removing the front viewing window).

5

Left magazine lock assembly. Includes the door tray detecting switch. Access this part by removing the panels on the left side of the library.

6

Right magazine lock assembly. Includes the door tray detecting switch Access this part by removing the panels on the right side of the library.

7

Vertical lift assembly

Internal FRUs continued Display cable Power switch cable Mailslot solenoid assembly Magazine lock harness cable Interconnect cable Chassis fan Motherboard

Index Description

1

Display cable (included in cable kit). Access this part by removing the library side panels. The display cable needs to be threaded underneath the right door tray rail to connect to the motherboard. Do not connect the display cable on all levels; only connect the cable located on the level with the display.

2

Power switch cable (included in cable kit). Access this part by removing the chin plate on the front and at the bottom of the library and the right side panel on the lowest library level.

3

Mailslot solenoid assembly. Access this part by removing the library side panels.

4

Magazine lock harness cable (included in cable kit). Access this part by removing the library side panels. Secure the cable to the side of the library chassis to ensure it does notg et damaged.

5

Interconnect cable that connects multi-level libraries

6

Chassis fan. Remove all cards from the back of the library.

7

Motherboard.

Model 12/140 replacement part numbers (FRUs)
This exploded view shows parts that are unique to this larger library.

Unique FRUs for model 12/140

Index Description

1

Top panel.

2

Filler panel.

3

Side panels.

4

Library expansion card, which is located only on level 5 of the library.

5

Front and back side panels on library.

6

Lift cover bottom panel.

7

Lift assembly with jack and handwheel.

8

Power distribution unit.

Document Location

Worldwide

Operating System

System x Hardware Options:All operating systems listed

[{"Type":"HW","Business Unit":{"code":"BU016","label":"Multiple Vendor Support"},"Product":{"code":"QU01UKG","label":"System x Hardware Options->Tape Library->Tape Library 3600"},"Platform":[{"code":"PF025","label":"Platform Independent"}],"Line of Business":{"code":"","label":""}},{"Type":"HW","Business Unit":{"code":"BU054","label":"Systems w\/TPS"},"Product":{"code":"QU01YKW","label":"System x Hardware Options->Tape Autoloader->Tape Autoloader 3600"},"Platform":[{"code":"PF025","label":"Platform Independent"}],"Line of Business":{"code":"","label":""}}]

Document Information

Modified date:
24 January 2019

UID

ibm1MIGR-53090