Product Documentation
Abstract
The hot-swap drive bays support hot-swap drives only. This section gives the procedure for installing a hot-swap hard disk drive. If you want to remove a drive, reverse the following steps.
Content
The hot-swap drive bays support hot-swap drives only. This section gives the procedure for installing a hot-swap hard disk drive. If you want to remove a drive, reverse the following steps.
Notes:
- To minimize the possibility of damage to the hard disk drives, install the server in the rack before installing the hard disk drives.
- You do not have to turn off the server to install hot-swap drives. However, you must turn off the server when performing any steps that involve installing or removing cables.
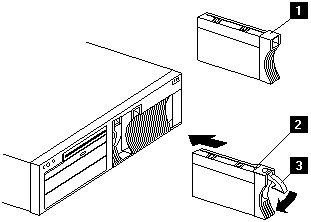
1. Filler panel
2. Drive tray assembly
3. Drive handle
| Installing a drive in a hot-swap drive bay |
|---|
WARNING: To maintain proper system cooling, do not operate the server for more than two minutes without either a drive or a filler panel installed for each bay.
- Remove the filler panel from one of the empty hot-swap bays by inserting the finger into the depression on the filler panel and pulling it away from the server.
- Install the hard disk drive in the hot-swap bay:
- Ensure the tray handle is open (that is, perpendicular to the drive).
- Align the drive/tray assembly with the guide rails in the bay.
- Gently push the drive/tray assembly into the bay until the drive connects to the backplane.
- Push the tray handle down until it locks.
- Check the hard disk drive status indicators to verify that the hard disk drive is operating properly.
Document Location
Worldwide
[{"Type":"HW","Business Unit":{"code":"BU016","label":"Multiple Vendor Support"},"Product":{"code":"HW18M","label":"Older System x->xSeries 340"},"Platform":[{"code":"PF025","label":"Platform Independent"}],"Line of Business":{"code":"","label":""}},{"Type":"HW","Business Unit":{"code":"BU016","label":"Multiple Vendor Support"},"Product":{"code":"HWN13","label":"Older System x->Netfinity 4500R"},"Platform":[{"code":"PF025","label":"Platform Independent"}],"Line of Business":{"code":"","label":""}}]
Was this topic helpful?
Document Information
Modified date:
24 January 2019
UID
ibm1MIGR-45568