Product Documentation
Abstract
1. Cover 2. Cover-release latch 3. Flanges Installing the server cover Place the cover-release latch in the open (up) position and align the flanges on the left and right sides of the cover with the slots on the server chassis. Close the
Content
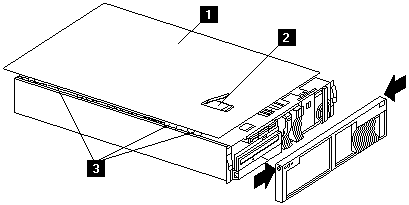
1. Cover
2. Cover-release latch
3. Flanges
| Installing the server cover |
|---|
- Place the cover-release latch in the open (up) position and align the flanges on the left and right sides of the cover with the slots on the server chassis.
- Close the cover-release latch.
| Installing the bezel |
|---|
- Align the trim bezel with the front of the server.
- Press inward on the top sides of the bezel and press the bezel toward the server until it clicks into place.
Note: To complete the installation, if you disconnected any cables from the back of the server, reconnect the cables; then, plug the power cords into properly grounded electrical outlets.
Document Location
Worldwide
[{"Type":"HW","Business Unit":{"code":"BU016","label":"Multiple Vendor Support"},"Product":{"code":"HW18M","label":"Older System x->xSeries 340"},"Platform":[{"code":"PF025","label":"Platform Independent"}],"Line of Business":{"code":"","label":""}},{"Type":"HW","Business Unit":{"code":"BU016","label":"Multiple Vendor Support"},"Product":{"code":"HWN13","label":"Older System x->Netfinity 4500R"},"Platform":[{"code":"PF025","label":"Platform Independent"}],"Line of Business":{"code":"","label":""}}]
Was this topic helpful?
Document Information
Modified date:
24 January 2019
UID
ibm1MIGR-45566