Product Documentation
Abstract
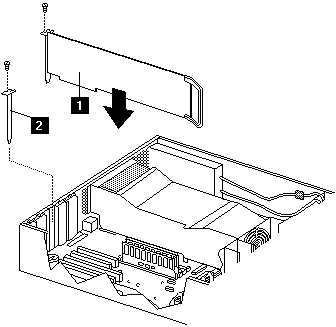
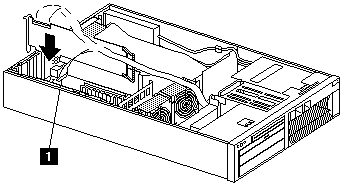
1. Adapter 2. Expansion-slot cover The following illustration shows the rerouting of the SCSI cable if you install a ServerRAID adapter. 1. Cable port Installing an adapter Turn off the server and peripheral devices and disconnect al
Content

1. Adapter
2. Expansion-slot cover
The following illustration shows the rerouting of the SCSI cable if you install a ServerRAID adapter.

1. Cable port
| Installing an adapter |
|---|
- Turn off the server and peripheral devices and disconnect all external cables and power cords; then, remove the cover and bezel.
- Determine which expansion slot you will use for the adapter.
Note: Check the instructions that come with the adapter for any requirements or restrictions.
- Remove the expansion slot cover:
- Loosen and remove the screw on the top of the expansion-slot cover.
- Slide the expansion-slot cover out of the server. Store it in a safe place for future use.
Attention: Expansion-slot covers must be installed on the openings for all vacant slots. This maintains the electromagnetic emissions characteristics of the system and ensures proper cooling of system components.
- Refer to the documentation that comes with the adapter for any cabling instructions. It might be easier for you to route any cables before you install the adapter.
- Remove the adapter from the static-protective package.
Note: Avoid touching the components and gold edge connectors on the adapter.
- Place the adapter, component-side up, on a flat, static protective surface.
- Set any jumpers or switches as described by the adapter manufacturer.
- Install the adapter:
- Carefully grasp the adapter by its top edge or upper corners, and align it with the expansion slot on the system board.
- Press the adapter firmly into the expansion slot.
Attention: When you install an adapter in the server, be sure that it is completely and correctly seated in the system-board connector before you apply power. Incomplete insertion might cause damage to the system board or the adapter.
- Insert and tighten the expansion-slot screw on the top of the adapter bracket.
- Connect any needed cables to the adapter.
- If you are installing a ServeRAID adapter, disconnect the cable from SCSI connector A on the system board and plug it into the connector on the top of the ServeRAID adapter.
- If you are installing an adapter that is not a ServeRAID adapter, refer to the documentation that came with the adapter for cabling instructions.
Attention: Route cables so that the flow of air from the fans is not blocked.
- Install any other options for the server.
Document Location
Worldwide
[{"Type":"HW","Business Unit":{"code":"BU016","label":"Multiple Vendor Support"},"Product":{"code":"HW18M","label":"Older System x->xSeries 340"},"Platform":[{"code":"PF025","label":"Platform Independent"}],"Line of Business":{"code":"","label":""}},{"Type":"HW","Business Unit":{"code":"BU016","label":"Multiple Vendor Support"},"Product":{"code":"HWN13","label":"Older System x->Netfinity 4500R"},"Platform":[{"code":"PF025","label":"Platform Independent"}],"Line of Business":{"code":"","label":""}}]
Was this topic helpful?
Document Information
Modified date:
24 January 2019
UID
ibm1MIGR-45564