Attach an AWS S3 bucket
You can attach an existing AWS S3 storage to your AoC organization. Once attached, you can make the bucket and its contents available to your AoC users.
Use this procedure when you have an existing AWS S3 and want to make it (or content from it) accessible to users in your AoC workspaces. If you already have an existing Aspera transfer node (which can be on-prem or in the cloud, and managed by you or by Aspera) with its Node URL and password, see Tether Your Aspera Transfer Server to Aspera on Cloud.
AWS storage classes
- Standard
- Intelligent Tiering
- Standard Infrequent Access
- One-zone Infrequent Access
- Glacier Instant Retrieval
- Glacier Flexible Retrieval
- Glacier Deep Archive
In a workspace configured on nodes with storage class Glacier Flexible Retrieval and Glacier Deep Archive, note the following:
- The Packages app is not available due to extended AWS retrieval times.
- Files app users:
- Can view files and folders. Files are marked with the label "Glacier storage". Folders are not labeled.
- Can share folders.
- Can upload files and folders. These items appear in the Files view after some time, depending on the duration required by AWS processing.
- Cannot download, move, copy, or rename files. If a user downloads a folder from such a workspace, the folder appears in the expected download location but remains empty.
AoC access keys
Once you attach the AWS S3 bucket, you can give various users access to specifically designated parts of the storage using AoC access keys. Distinct from the AWS S3 bucket access keys, these native AoC access keys are an additional layer of security that allow you to securely access the bucket through AoC and other Aspera client applications. You can create multiple AoC access keys to the same AWS S3 bucket to partition access to specific areas of the storage. For details, see the articles in Access keys.
Prerequisites
- You must have transfer service administrator (ATS admin) access to Aspera on Cloud.
- You must have administrative access to the AWS S3 configuration portal.
- The AWS S3 bucket must be in a region that is supported by the Aspera transfer service. To view the supported regions, to see IP addresses for whitelisting in your firewall configuration, and to retrieve your transfer service server URL, follow this link: https://ats.aspera.io/pub/v1/servers/AWS.
- You must have an AWS S3 IAM Role to use for trust relationship policies. You need to add this role in the AWS portal Trust relationships tab. Note the role name so you can add it in the following procedure; for example, "Aspera-Role". To create an IAM role, see Create an AWS S3 IAM role and policy.
- To provide extra security for your environment, see the procedure below called "Enhance Access Security for an AWS S3 Bucket".
Procedure: How to attach the bucket to AoC
This procedure requires you to use both the Aspera on Cloud Admin interface and the AWS portal interface.
- To share a folder in the bucket with members of an existing workspace, see Share a node folder with a workspace.
- To create a new workspace hosted on this bucket, see Create a new workspace.
- To create native AoC access keys to the bucket or a partition of the bucket, see Create a sub-access key to a cloud storage folder.
Optional: Enhance access security for an AWS S3 bucket
- In the Amazon console, go to the intended bucket, then click Permissions > Block public access.
- Configure the options as shown in the following screen shot, being sure not to block
cross-account access.

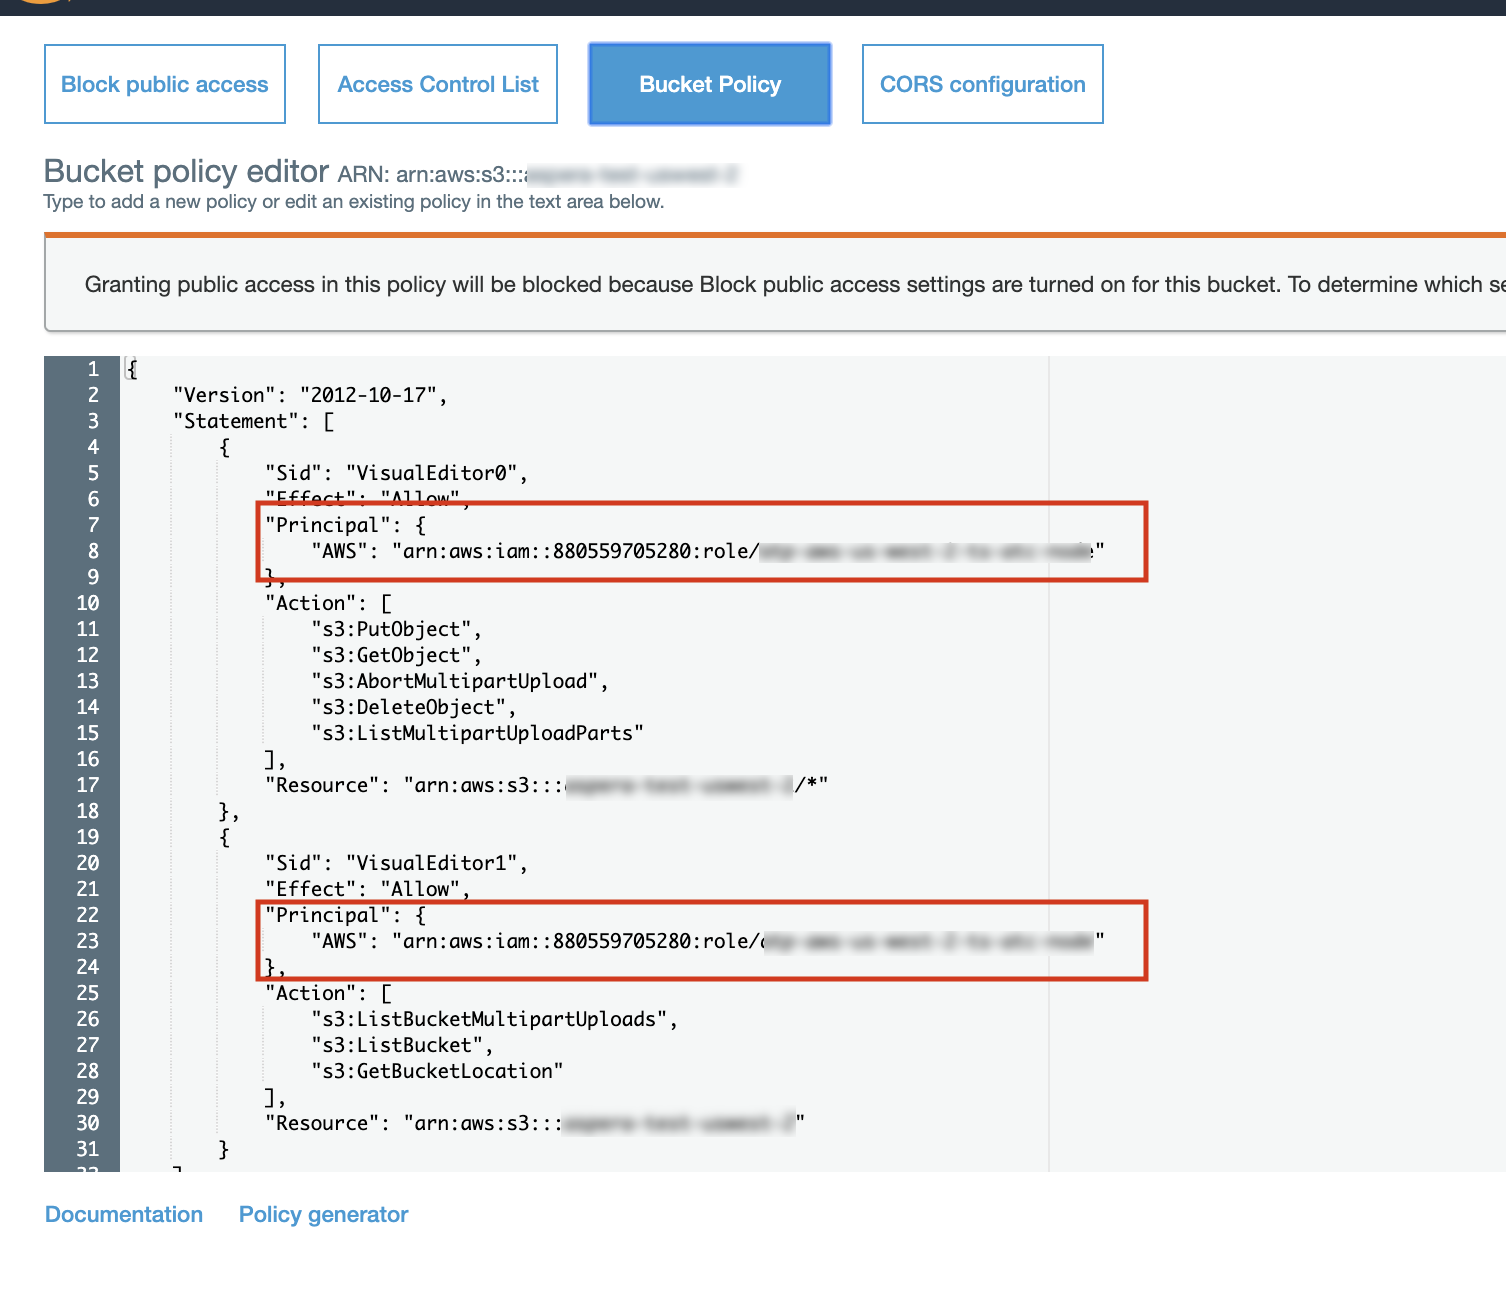
- Go to Permissions > Bucket Policy.
- Enter the same policy that you applied to the associated role.
- Copy the "Principal" stanza from the trust relationship in the role to the bucket policy, as
show in the screen shot below.

- If desired, use this JSON example, changing the following:
- Replace the sample "Principal" stanza shows below with the actual "Principal" stanza from the trust relationship in the associated role.
- For the variable <region>, substitute the region for your bucket.
- For the variable <bucket_name>, substitute the bucket name.
- For the variable <allowed_IP_address>, substitute the allowed IP address(es), formatted in a JSON array (for example: ["192.0.2.0/24", "203.0.113.0/24"]
- For the variable <ats_vpc>, substitute the AWS virtual private cloud ID or VPC endpoint ID (see list following this sample).
{
	"Version": "2012-10-17",
	"Statement": [{
			"Effect": "Allow",
			"Principal": {
				"AWS": "arn:aws:iam::880559705280:role/atp-aws-us-<region>-ts-atc-node"
			},
			"Action": [
				"s3:AbortMultipartUpload",
				"s3:DeleteObject",
				"s3:ListMultipartUploadParts",
				"s3:PutObject"
			],
			"Resource": [
				"arn:aws:s3:::<bucket_name>/*"
			],
			"Condition": {
				"NotIpAddress": {
					"aws:SourceIp": "<allowed_IP_address>"
				},
				"StringNotEquals": {
					"aws:SourceVpc": "<ats_vpc>"
				}
			}

		},
		{
			"Effect": "Allow",
			"Principal": {
				"AWS": "arn:aws:iam::880559705280:role/atp-aws-<region>-ts-atc-node"
			},
			"Action": [
				"s3:GetBucketLocation",
				"s3:ListBucket",
				"s3:ListBucketMultipartUploads"
			],
			"Resource": [
				"arn:aws:s3:::<bucket_name>"
			],
			"Condition": {
				"NotIpAddress": {
					"aws:SourceIp": "<allowed_IP_address>"
				},
				"StringNotEquals": {
					"aws:SourceVpc": "<ats_vpc>"
				}
			}

		}
	]
}
Find the required VPC ID and VPCE ID listed by AWS region below:
atp-aws-ap-northeast-1-vpc = ------------------------------------------------
  vpc name: atp-ap-northeast-1-ts-vpc
  vpc id:   vpc-ddce48b9
  vpce id:  vpce-86f431ef
atp-aws-ap-southeast-1-vpc = ------------------------------------------------
  vpc name: atp-ap-southeast-1-ts-vpc
  vpc id:   vpc-c9b884ad
  vpce id:  vpce-c25a8bab
atp-aws-ap-southeast-2-vpc = ------------------------------------------------
  vpc name: atp-ap-southeast-2-ts-vpc
  vpc id:   vpc-3cc0c758
  vpce id:  vpce-8c9c5ae5
atp-aws-eu-central-1-vpc = ------------------------------------------------
  vpc name: atp-eu-central-1-ts-vpc
  vpc id:   vpc-dac878b2
  vpce id:  vpce-bfae55d6
atp-aws-eu-west-1-vpc = ------------------------------------------------
  vpc name: atp-eu-west-1-ts-vpc
  vpc id:   vpc-00a8d564
  vpce id:  vpce-7495681d
atp-aws-sa-east-1-vpc = ------------------------------------------------
  vpc name: atp-sa-east-1-ts-vpc
  vpc id:   vpc-5c7aed3b
  vpce id:  vpce-31945458
atp-aws-us-east-1-vpc = ------------------------------------------------
  vpc name: atp-us-east-1-ts-vpc
  vpc id:   vpc-dc6a60bb
  vpce id:  vpce-4c278825
atp-aws-us-west-2-vpc = ------------------------------------------------
  vpc name: atp-us-west-2-ts-vpc
  vpc id:   vpc-b69e77d1
  vpce id:  vpce-62c1390b
For more information on bucket policies, refer to the AWS documentation.


