Replacing the system backplane in the 8408-44E or 8408-E8E
To replace the system backplane, complete the steps in this procedure.
Procedure
- Replace the backplane into the system. Attention: Carefully remove the replacement system backplane from the ESD bag it is shipped in. To lift the FRU from the packaging, hold the sides of the system backplane. Do not lift the FRU from the packaging by holding the top or the bottom of the system backplane. Refer to the instructions that were shipped with this FRU.
- Lower the system backplane into
the system by using the handles on the side of the backplane as shown
in Figure 1. Figure 1. Replacing the system backplane

- Lower the hinged brackets (B) and
tighten the thumbscrews. Figure 2. Replacing the system backplane

- Tighten the four captive
screws (A) of the system backplane by using
a 4 mm Allen wrench. See Figure 3. Figure 3. Tightening the system backplane screws

- Lower the system backplane into
the system by using the handles on the side of the backplane as shown
in Figure 1.
- Label
and remove the processor heat sinks from the original system backplane. Note: The processor heat sink must be replaced onto the same processor from which it was removed.
- Loosen the load arm screw (A) of
the system processor heat sink (B) that you
are removing with the supplied T-handle T20 Torx driver (part number
00LR425). The load arm pivots up in the direction that is shown in Figure 4. Figure 4. Loosening the load arm screw of the heat sink

Figure 5. Cleaning the system processor module area
- Loosen the load arm screw (A) of
the system processor heat sink (B) that you
are removing with the supplied T-handle T20 Torx driver (part number
00LR425). The load arm pivots up in the direction that is shown in Figure 4.
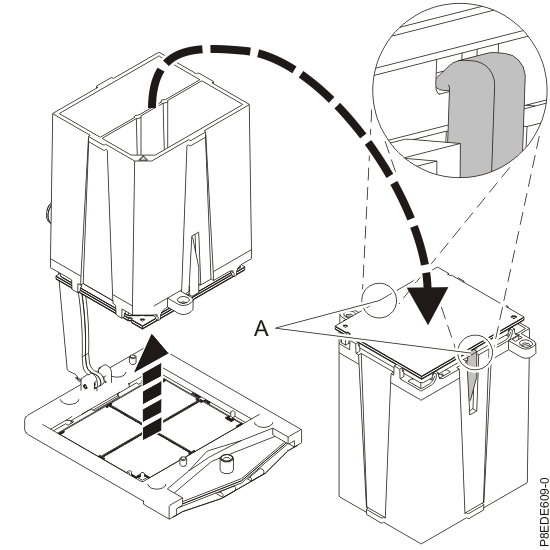
- Remove the system processor
socket covers from the replacement system backplane.
- Grasp the socket cover tabs with the supplied cover removal tool (part number 00FX605). Squeeze the removal tool handles. Then, lift the cover straight up. See Figure 6.
- Repeat step 4 for the remaining covers.
Figure 6. Removing the system processor socket cover
- Replace the processor modules
and heat sinks.
- Lower the supplied removal tool
(part number 00FW771) onto the system processor module in the original
system backplane. The beveled corner (A) of
the tool must align with the beveled corner of the system processor
module. Align the tabs (B) of the tool with
the pins (C) of the processor socket. See Figure 7. Figure 7. Lowering the removal tool onto the system processor module

- Push down on the tool at the locations
that are indicated by the arrows to lock the system processor module
into the removal tool. See Figure 8. Do not press the blue release tabs until directed
to do so later. Note: The tool drops slightly when you push down so that the jaws can grab the bottom of the system processor module.Figure 8. Locking the replacement system processor module in the removal tool

- Grasp the sides of the tool
and system processor module and carefully lift it slightly out of
the original system backplane. Then, turn it over so that the system
processor module side is up. Ensure that both tool jaws (A) are
firmly grabbing the system processor module, as shown in Figure 9. Note: If both jaws are not firmly grabbing the system processor module, press down on the corner of the system processor module closest to the jaw until it locks into place. Do not touch any part of the system processor module other than the corners.Figure 9. Ensuring that the system processor module is securely locked in tool
- Lower the tool and
system processor module onto the socket in the replacement system
backplane. Ensure that the two guide pins are inserted into the alignment
holes on each side of the tool, as shown in Figure 10. Note: Do not attempt to slide the tool and the system processor module in any direction while the system processor module is touching the socket. If the tool and the system processor module are not aligned with the guide pins, lift the tool and the system processor module and reposition them.Figure 10. Lowering the system processor module onto the socket

- After the system processor
module is properly aligned, squeeze and hold the two blue release
tabs (A) together until a firm stop is reached,
as shown in Figure 11. Then, lift the tool off the system processor module. Figure 11. Removing the system processor module tool

- Inspect the thermal interface
material (TIM) for visible signs of damage, as shown in Figure 12. Note: When the heat sink is removed from the system processor module, the TIM should be adhered to the heat sink. Unless damaged, the TIM that is adhered to the heat sink can be reused. Replace the TIM if the TIM is damaged. Do not reuse the removed heat sink if the TIM is damaged. Either discard the heat sink and the damaged TIM locally or return them to IBM® based on part-order-form part status. It is recommended that a spare TIM and heat sink, (part number 00LR426), be on hand before you replace the system processor module.Figure 12. Inspecting the thermal interface material

- Center the TIM onto the processor module. Figure 13. Replacing the thermal interface material

- Replace the heat sink
onto its original processor. Lower
the heat sink over the system processor module, ensuring that the
holes in the heat sink (A) align with the two
guide pins (B) on the socket, as shown in Figure 14. Figure 14. Replacing the heat sink

- Move
the load arm into position over the heat sink and tighten the load
arm screw (A) with the supplied T-handle T20
Torx driver part number 00LR425, as shown in Figure 15. Note: Do not overtighten the load arm screw.Figure 15. Tightening the load arm screw

- Lower the supplied removal tool
(part number 00FW771) onto the system processor module in the original
system backplane. The beveled corner (A) of
the tool must align with the beveled corner of the system processor
module. Align the tabs (B) of the tool with
the pins (C) of the processor socket. See Figure 7.
- Replace
the memory.
- The lever action of the
tabs forces the memory out of the connector. Hold the memory by the
edges and pull it out of the system. Figure 16. Removing memory from the system

- Press the memory firmly into
the slot until the locking tab (A) locks in
place. See Figure 17. Figure 17. Replacing memory

- The lever action of the
tabs forces the memory out of the connector. Hold the memory by the
edges and pull it out of the system.
- Replace
the processor voltage regulator modules (VRM).
- Pull the processor voltage
regulator module out of the connector. Figure 18. Removing the processor voltage regulator module

- Secure the processor voltage
regulator module by pushing in the connector tabs (A) until
it is secured to the system's chassis, as shown in Figure 19. Figure 19. Installing the processor voltage regulator module

- Pull the processor voltage
regulator module out of the connector.
- Replace the memory voltage regulator modules if present.
- Pull out the memory voltage regulator modules from the slots by holding the blue tabs (A) and
by supporting the bottom of the cards, as shown in Figure 20. Figure 20. Removing the memory voltage regulator modules

- Press down the memory voltage regulator modules till they are firmly in place. Note: While replacing the memory voltage regulator module, ensure that the green tab (A) is on the side of the VRM that is closest to the front of the system. This check ensures that the orientation of the VRM in the system is correct.Figure 21. Installing the memory voltage regulator modules

- Pull out the memory voltage regulator modules from the slots by holding the blue tabs (A) and
by supporting the bottom of the cards, as shown in Figure 20.
- Replace
the front fans into their original positions.
- Ensure that the fan handle (A) is rotated open as shown in Figure 22.
- Using your hand to support the bottom of the fan, align the fan with the fan slot and slide it into the system.
- Rotate the fan handle (A) in the direction that is shown and then press the fan handle until the latch locks in place. See Figure 22.
- Repeat step 9 for the remaining front fans.
Figure 22. Replacing the front fan