Blog Post
Do you know what’s in Helm 3?
New capabilities and migration options in the package manager for Kubernetes
Helm 3 is one of the most eagerly anticipated releases for the last year or so. This latest version of Helm, the package manager for Kubernetes, is now available.
The excitement for this release was heightened by the promise of removing Tiller, the in-cluster component of Helm that interacted directly with the Kubernetes API server to install, upgrade, query, and remove Kubernetes resources. However, Helm 3 goes far beyond removing Tiller.
Helm 3 introduces a rich set of new capabilities. There are major changes to the architecture and internal plumbing of Helm, essentially making it a new product when compared forensically against Helm 2. Therefore, understanding the migration path from Helm 2 to Helm 3 is important.
This blog post discusses the new capabilities and the migration options. As always, the best reference for Helm is the Helm community and the Helm documentation.
New capabilities in Helm 3
Helm 3 includes the following major changes:
- Client only architecture
- XDG base directory specification
- No need to initialize Helm
- Release storage changed
- Modifications to charts
- Chart repository status
- Improved release upgrade strategy
- Simplified CRD support
- Helm test framework updates
- Helm 2 interface still supported
- Helm Go library overhauled
- Other changes
Client-only architecture
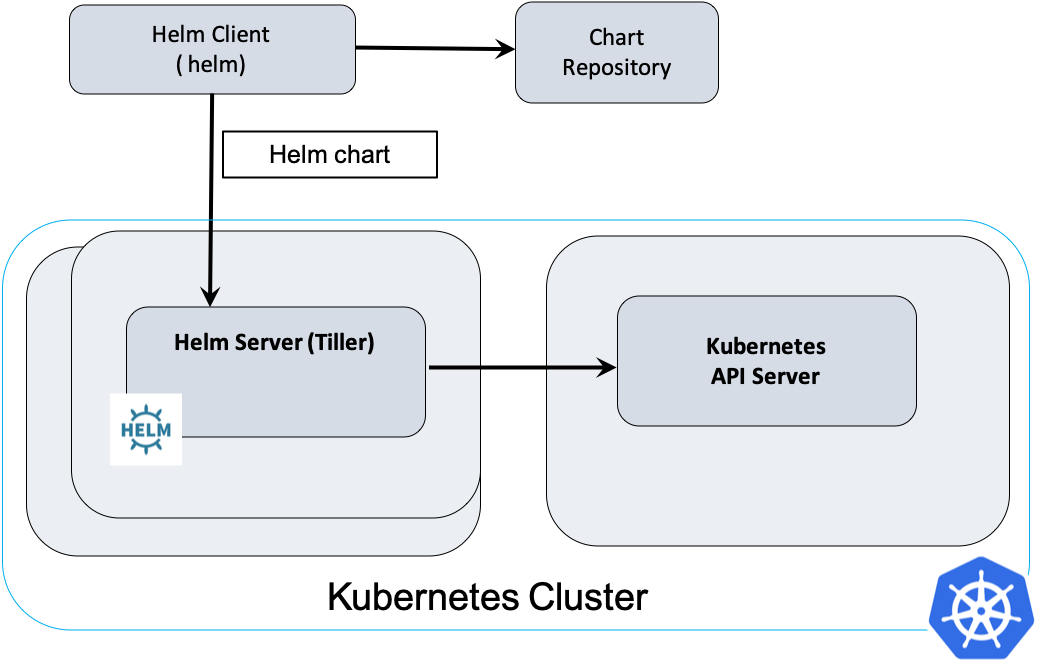
To recap, Helm 2 is a client-server architecture with the client called helm and the server called Tiller. The client is a CLI that users interact with to perform different operations like install, upgrade, and delete. As seen in the following diagram, the client interacts with Tiller and the chart repository. Tiller interacts with the Kubernetes API server. It renders Helm template files into Kubernetes manifest files, which it uses for operations on the Kubernetes cluster through the Kubernetes API.
Helm 3 has a client-only architecture with the client still called helm. As seen in the following diagram, it operates similar to the Helm 2 client, but the client interacts directly with the Kubernetes API server. The in-cluster server Tiller is now removed.
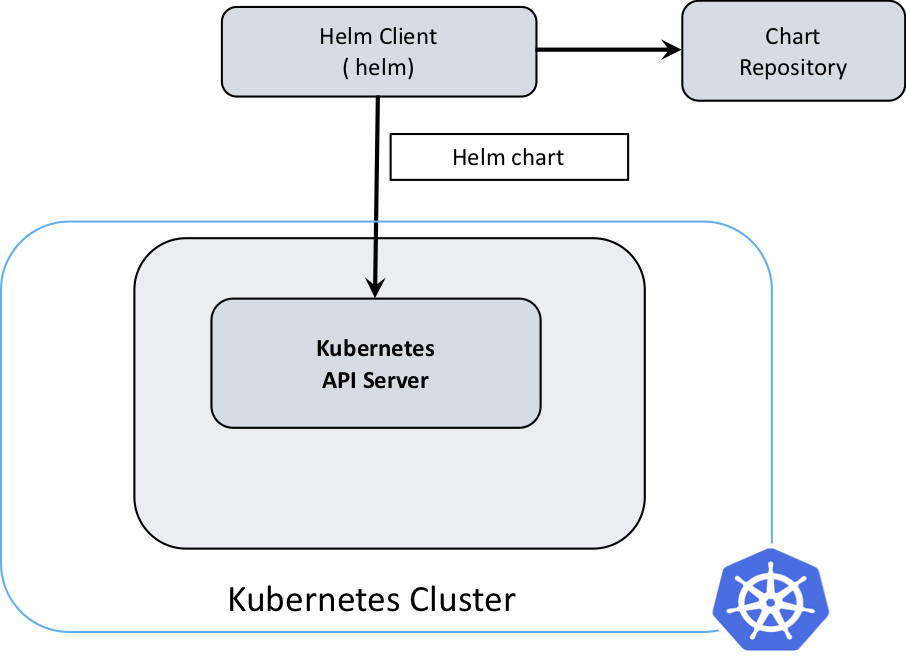
The main benefit of removing Tiller is that security is now on a per-user basis. It is delegated to Kubernetes user cluster security. Access to the cluster using Helm 3 is similar to kubectl, for example, the kubeconfig files.
The following examples explains the effects of removing of Tiller. The examples shown use kubectx, a useful project built on top of kubectl that provides the following tools:
kubectxhelps you switch between clusters.kubenshelps you switch between Kubernetes namespaces.
First, review an example with Kube context dev, which uses active namespace dev:
$ kubectx
dev
test

$ kubectx dev
Switched to context "dev".

$ kubens
default
dev
kube-node-lease
kube-public
kube-system
test

$ kubens dev
Context "dev" modified.
Active namespace is "dev".

$ helm create chrt-demo
Creating chrt-demo

$ helm install chrt-demo chrt-demo/
NAME: chrt-demo
LAST DEPLOYED: Tue Oct 22 16:20:48 2019
NAMESPACE: dev
STATUS: deployed
REVISION: 1
NOTES:
1. Get the application URL by running these commands:
  export POD_NAME=$(kubectl get pods --namespace dev -l "app.kubernetes.io/name=chrt-demo,app.kubernetes.io/instance=chrt-demo" -o jsonpath="{.items[0].metadata.name}")
  echo "Visit http://127.0.0.1:8080 to use your application"
  kubectl port-forward $POD_NAME 8080:80

$ kubectl get all -n dev
NAME                             READY   STATUS    RESTARTS   AGE
pod/chrt-demo-64f4c457c4-dkr9k   1/1     Running   0          31s

NAME                TYPE        CLUSTER-IP     EXTERNAL-IP   PORT(S)   AGE
service/chrt-demo   ClusterIP   10.96.246.53   <none>        80/TCP    31s

NAME                        READY   UP-TO-DATE   AVAILABLE   AGE
deployment.apps/chrt-demo   1/1     1            1           31s

NAME                                   DESIRED   CURRENT   READY   AGE
replicaset.apps/chrt-demo-64f4c457c4   1         1         1       31s
Then, this example changes the kube context to test, which uses active namespace test:
$ kubectx
dev
test

$ kubectx test
Switched to context "test".

$ kubens
default
dev
kube-node-lease
kube-public
kube-system
test

$ kubens test
Context "test" modified.
Active namespace is "test".

$ helm install chrt-demo chrt-demo/
NAME: chrt-demo
LAST DEPLOYED: Tue Oct 22 15:42:59 2019
NAMESPACE: test
STATUS: deployed
REVISION: 1
NOTES:
1. Get the application URL by running these commands:
  export POD_NAME=$(kubectl get pods --namespace test -l "app.kubernetes.io/name=chrt-demo,app.kubernetes.io/instance=chrt-demo" -o jsonpath="{.items[0].metadata.name}")
  echo "Visit http://127.0.0.1:8080 to use your application"
  kubectl port-forward $POD_NAME 8080:80

$ kubectl get all -n test
NAME                             READY   STATUS              RESTARTS   AGE
pod/chrt-demo-64f4c457c4-dpp8k   0/1     ContainerCreating   0          13s

NAME                TYPE        CLUSTER-IP     EXTERNAL-IP   PORT(S)   AGE
service/chrt-demo   ClusterIP   10.99.218.92   <none>        80/TCP    13s

NAME                        READY   UP-TO-DATE   AVAILABLE   AGE
deployment.apps/chrt-demo   0/1     1            0           13s

NAME                                   DESIRED   CURRENT   READY   AGE
replicaset.apps/chrt-demo-64f4c457c4   1         1         0       13s
From a release perspective, it means that releases are now persisted on a user or release namespace basis and not in the Tiller namespace anymore. The following sections discuss more benefits of removing Tiller.
XDG base directory specification
Helm state information consists of configuration, data, and cached files that are stored on the file system.
In Helm 2, the state information is stored in <USER>/.helm by default. It can be changed by setting the $HELM_HOME environment variable, or by using the global flag --home.
In Helm 3, the XDG base directory specification is supported. This portable standard defines categories for application state information on the file system. It is platform independent.
Helm now supports the following environment variables as part of the categories support:
- Cache:
$XDG_CACHE_HOME, for example,${HOME}/.cache/helm/ - Configuration:
$XDG_CONFIG_HOME, for example,${HOME}/.config/helm/ - Data:
$XDG_DATA_HOME, for example${HOME}/.local/share/helm
The following new environment variables are introduced to the Helm plugins environment to map to the XDG categories:
- Cache:
$HELM_PATH_CACHE - Config:
$HELM_PATH_CONFIG - Data:
$HELM_PATH_DATA
Even though Helm 2 environment variables (like $HELM_HOME) are supported for backward compatibility, it is recommended that Helm plugins that support Helm 3 should consider using the new environment variables instead.
No need to initialize Helm
A welcome side effect of removing Tiller and supporting XDG is that initializing Helm is obsolete in version 3. In other words, helm init was removed and you don’t need to install Tiller in the cluster and set up a Helm state before using it. A Helm state is created automatically when required.
Release storage changed
A release tracks a chart that is installed by Helm.
In Helm 2, releases are stored as ConfigMaps (default) or Secrets in the cluster under the Tiller namespace, kube-system (default). The Helm Release object is stored in the data.release field of the Configmap or Secret as a base-64 encoded, gzipped archive.
See the following example of two charts deployed in Helm v2:
$ helm ls
NAME           REVISION    UPDATED                     STATUS      CHART                APP VERSION    NAMESPACE
chrt-foobar    2           Mon Oct 14 15:07:09 2019    DEPLOYED    chrt-foobar-0.1.0    1.0            default
chrt-test      1           Mon Oct 14 15:31:42 2019    DEPLOYED    chrt-test-0.1.0      1.0            test
The release versions are stored as ConfigMaps in the Tiller namespace with names of <release_name>.v<revision_version>:
$ kubectl get configmap -l "OWNER=TILLER" --all-namespaces
NAMESPACE     NAME             DATA   AGE
kube-system   chrt-foobar.v1   1      25m
kube-system   chrt-foobar.v2   1      25m
kube-system   chrt-test.v1     1      72s
The storage is changed in Helm 3 as follows:
- Releases are stored as Secrets by default.
- Storage is in the namespace of the release.
- Naming is changed to
sh.helm.release.v1.<release_name>.v<revision_version>. - The Secret type is set as
helm.sh/release.v1. - Labels changed from the Helm 2 ConfigMap/Secret.
- Due to changes in the underlying internals, the Release object stored in
data.releasediffers from the Helm 2 Release object.
The previous Helm 2 example now looks something like the following example:
$ helm ls --all-namespaces
NAME           NAMESPACE    REVISION    UPDATED                                    STATUS      CHART                APP VERSION
chrt-foobar    default      2           2019-10-14 15:18:31.529138228 +0100 IST    deployed    chrt-foobar-0.1.0    1.16.0
chrt-test      test         1           2019-10-14 15:20:28.196338611 +0100 IST    deployed    chrt-test-0.1.0      1.16.0

$ kubectl get secret -l "owner=helm" --all-namespaces
NAMESPACE   NAME                                TYPE                 DATA   AGE
default     sh.helm.release.v1.chrt-foobar.v1   helm.sh/release.v1   1      3m2s
default     sh.helm.release.v1.chrt-foobar.v2   helm.sh/release.v1   1      2m40s
test        sh.helm.release.v1.chrt-test.v1     helm.sh/release.v1   1      43s
Modifications to charts
The chart infrastructure changed in Helm 3. The apiVersion in Chart.yaml was bumped as a consequence from v1 to v2, to help identify charts with Helm 2 and Helm 3 formats. Note that Helm 3 can still render v1 formats, but Helm 2 cannot render v2 formats. The sections that follow describe the changes.
Chart dependency updated
In Helm 2, chart dependencies are declared in requirements.yaml, as shown in the following example:
dependencies:
- name: mysql
  version: "1.3.2"
  repository: "https://kubernetes-charts.storage.googleapis.com"
Chart dependencies are consolidated in Helm 3, moving the dependency definitions to Chart.yaml. The lock file has also changed to Chart.lock.
Use the new format when creating charts for Helm 3.
Library charts
The common or helper chart provides a reuse pattern for chart definitions in Helm.
The library chart was introduced as a new type of chart so that common charts can be supported as first class citizens in Helm. A new type is added to the Chart.yaml, and it can be either application or library. Application is the standard chart, which creates release artifacts during rendering.
Library charts are declared as a dependency directive in Chart.yaml, and are managed like any other chart, except that they are not installed.
Chart value validation
In Helm 3, values passed to a chart during some Helm commands can be validated against a JSON schema. This validation is beneficial to help chart consumers avoid setting incorrect values and help improve chart usability. Enable it by adding a schema file named values.schema.json in the chart folder.
The following commands call the validation:
helm installhelm upgradehelm templatehelm lint
Chart repository status
Helm 3 includes the following changes to the chart repository:
- The Helm Hub is introduced as a central catalog for Helm chart repositories.
localandstablerepositories are no longer added by default. You must add the repositories to the Helm repository list:$ helm3 repo add stable https://kubernetes-charts.storage.googleapis.com $ helm3 repo updatehelm searchnow supports both local repository searches and making search queries against Helm Hub. Thehelm search hubonly shows the repositories that are part of the Helm Hub. You still must add the relevant repository to the Helm repository list to be able to use a chart from that repository.
Improved release upgrade strategy
The Helm 2 release upgrade used a two-way strategic merge patch. During an upgrade, it compared the most recent chart manifest against the proposed chart manifest (the one supplied during helm upgrade). If changes were applied to the cluster outside of Helm (such as kubectl edit), those changes were not considered.
In Helm 3, the release upgrade uses a three-way strategic merge patch. Helm considers the old manifest, cluster live state, and the new manifest when generating a patch.
Simplified custom resource definition (CRD) support
To be frank, Helm 2 does not handle CRDs well. The crd-install hook never worked in a consistent and robust manner because of the custom resource was cluster-wide and not always owned solely by an application.
Helm 3 over-hauled and simplified Helm CRD support. The crd-install hook is removed and replaced with a crds sub-folder in the chart folder. All CRDs defined in crds are installed before rendering the other chart artifacts. Deleting and upgrading CRDs are not handled.
In conclusion, Helm 3 does not try to provide full CRD support, because it is beyond its scope. It just provides support to install a CRD in a simple fashion. The CRD proposal and feature provide more in-depth details on the design decisions taken.
Helm test framework updates
Helm 3 includes the following updates to the test framework (helm test):
- You can define tests as
Jobresources. - The
test-failurehook was removed. - The
test-successhook was renamed totest, but the alias remains fortest-success. - You can dump logs from test pods with
--logsflag. - The
--cleanupflag was removed. To remove test resources, you need to sethelm.sh/hook-delete-policy, manually delete resources withkubectl, or set TTL for Job resources.
Helm 2 interface still supported
After learning about all these changes, you are probably wondering “Will my chart from Helm 2 still render and deploy with Helm 3?” The short answer is yes! However, there are some changes that aren’t backward compatible with Helm 2:
- Release names are no longer auto-generated by default with
helm install. You must use the--generate-nameflag. - Namespaces are no longer created when Helm creates a release. You must create namespaces in advance.
- The upgrade command added flag
--history-max, which limits the maximum number of revisions saved per release (10 by default), - The following commands were removed:
helm homehelm inithelm resethelm serve
- The following commands were renamed:
helm delete–>helm uninstall: removes all release history by default (previously needed –purge)helm fetch–>helm pullhelm inspect–>helm show
- The following command was updated:
helm template <chart> -x <path_to_template>–>helm template <release_name> <chart> -s <path_to_template>
Helm Go library overhauled
As mentioned in the introduction, Helm 3 greatly changed under the hood from Helm 2. There are a lot of changes to the architecture (no more client/server and gRPC) and infrastructure (underlying code and packages). What does this mean for people who have being using Helm as a Go library or directly through its code in the backend?
Put simply, quite a lot. The main application code (/cmd) and the library code (/pkg) were overhauled to improve usability. Helm 3 has a cleaner and clearer interface in the library and removes any overlap with the CLI code.
The following example shows how to access the library in Helm 3:
import (
        "log"

        "helm.sh/helm/v3/pkg/action"
        "helm.sh/helm/v3/pkg/cli"
)

func main() {
        settings = cli.New()

        actionConfig := new(action.Configuration)
        err := actionConfig.Init(settings.RESTClientGetter(), namespace, os.Getenv("HELM_DRIVER"), log.Printf)
        if err != nil {
               log.Fatalf("Failed to get Helm action config: %v", err)
        }

        client := action.NewGet(actionConfig)
        rel, err := client.Run("mysql")
        if err != nil {
               log.Fatalf("Failed to get run command: %v", err)
        }
        log.Printf("%+v", rel)
}
Helm 3 switched to Go modules for dependency management and moved the project path from k8s.io/helm to helm.sh/helm. A nuance with the dependency management is that you need to add /v3 when importing the packages. See Go Releasing Modules.
Using the Helm 3 library requires rework if you previously used the Helm 2 library. The best place to start is to look how the CLI code (/cmd) interfaces with the Helm library and go from there.
Other changes
OCI registry support was added as an experimental feature in Helm 3.
Also, release binaries in Helm 3 are hosted on https://get.helm.sh. Details on the reason for changing the hosting is described in Move Helm Downloads.
Migration from Helm 2 to Helm 3
As previously described, there are major changes to the architecture and internal plumbing of Helm 3. These changes also include Helm state and release data – both metadata and storage. From a migration perspective, it means more than just a simple binary change. It means two separate products.
The differences between them allow you to look at the Helm 2 to Helm 3 migration as two separate and distinct options:
- Helm 2 and Helm 3 managing the same cluster.
- Migrating Helm 2 to Helm 3
Helm 2 and Helm 3 manage the same cluster
This option is if you want to manage the migration yourself. You might not trust any kind of conversion tool and would rather run Helm 2 and Helm 3 alongside each other. The strategy might be to effectively drain away Helm 2 releases, because you release new versions of your applications using Helm 3. It eventually leads to Helm 3 solely managing the cluster and Helm 2 becoming irrelevant.
As a result of the changes in Helm 3, this option is quite easy to set up, because Helm 2 and Helm 3 only conflict with the Helm binary. With both binaries being named helm, you need to either rename the Helm 3 binary or place it in a different location to the Helm 2 binary. For more details on this and the other migration use case, see the Helm migration documentation.
Migrating Helm 2 to Helm 3
This option applies when you want Helm 3 to manage existing Helm 2 releases. This option requires an understanding of how the Helm 2 client is set up. Does the client manage more than one cluster, and does it connect to more than one Tiller instance? Know where releases are stored and under which Tiller namespace.
Luckily, this process is automated by the Helm 3 2to3 plugin. If you are interested in this approach, study the Helm migration documentation and the Helm 3 2to3 plugin README. These resources provide a one-stop shop on Helm 2 to Helm 3 migration, including the intricacies between each version.
Summary
Helm 3 is more than just removing Tiller. There are a lot of new capabilities worth trying out.
Remember that the major changes to the architecture and internal plumbing of Helm 3 essentially makes it a new product when compared forensically against Helm 2. This means little or no difference from a CLI or usage point of view. It does become significant when migrating, interfacing through the client library, or under the hood.
Now you should have a good understanding of Helm 3. Go forth and take it for a test drive!