Relationships tab
Use the Relationships tab to define the traversal path for selecting data from tables that are referenced in an Access Definition. The traversal path determines the sequence in which a process visits each table. If you edit or browse database data, the information on this tab cannot be edited.
The Start Table and any reference tables that are listed on the Tables tab are always included in a process. However, to select related data from other tables that are listed in an Access Definition, you must define the traversal path.

Status
The status of the relationship. Changes to the DB Alias or Creator ID for a table that is referenced in the Access Definition can affect the status of a relationship. Status is populated automatically and cannot be modified.
- blank
- Relationship is defined and is not new to the list.
- New
- Relationship is new and status is not Unknown or Ref.
The status of a relationship is New the first time the list is displayed
after:
- A new relationship between tables on the list is defined.
- A table is added to the list.
When you run a process with the Access Definition, a warning message advises you of New relationships. Although you can proceed despite the warning, it might be prudent to review the relationship usage list.
- Unknown
- Relationship does not exist. This condition can occur when a change in Default Qualifier causes a new set of tables and relationships to be referenced in the Access Definition. Relationships that have Unknown status are ignored during a process. To remove a relationship in Unknown status, right-click to open the shortcut menu and select Remove or Remove All Unknown.
- Ref
- Table is a reference or look-up table, as specified on the Tables tab.
Select
Select the check box to include a relationship in the process. Clear the check box to exclude the relationship. To use relationships with New status automatically, select Use new relationships. Right-click the grid column to select or clear the check boxes for all listed relationships.
To edit a relationship, right-click a grid row and select Open Relationship from the shortcut menu.
Options
- Option (1)
- Select this check box to traverse the relationship from child to parent to select a parent row for each child row. This option ensures the relational integrity of the selected data. Option (1) is selected by default.
- Option (2)
- Select this check box to traverse the relationship to select additional child rows for each parent row that is selected as a result of a traversal from child to parent. When the process follows the path from child to parent, and a parent row is selected, Option (2) ensures that additional child rows are selected for that parent. Option (2) is cleared by default.
- Options (1) and (2) are relevant when the Start Table is a child table or when a table has more than one parent table that is referenced by the Access Definition.
- Option (2) is relevant only if you traverse a relationship from child to parent. For example, if a process traverses from child to parent [Option (1)] and a parent row is selected, selecting Option (2) causes the process to select additional child rows for that parent row.
- If you select Option (2) for a relationship, consider a Child Limit on the number of child rows to extract for any relationship.
To review the traversal path, select the Show Steps option from the Tools menu. For details, see Show Steps.
Child Limit
Maximum number of rows from the child table to be selected for a relationship (for example, five orders for each customer).
Parent Table
Name of the parent table in the relationship. You cannot modify this value.
Child Table
Name of the child table in the relationship. You cannot modify this value.
Constraint
Base name for the relationship. You cannot modify this value.
Type
The type of relationship, indicated by DBMS name, Optim™, or Generic. You cannot modify this value.
Table Access
Allows you to override the default method (scan or key lookup) for accessing the parent or child table for each relationship. A scan reads all rows in a table at one time; whereas a key lookup locates rows using a WHERE clause to search for primary or foreign key values. (Override the default method only if the statistical information in the process report indicates that the default method is less efficient.) Specify:
- Default
- Optim determines
the best method. Note: A key lookup is used when a DBMS index is available, and a scan when an index is not available. However, if you access a significant portion of the table, the default is to scan, even if an index exists.
- Force Scan
- Force Optim to use a scan.
- Force Key Lookup
- Force Optim to use
a key lookup. Note: To verify that a DBMS index exists or to create indexes for the parent and child tables in each selected relationship, use the Relationship Index Analysis dialog.
To set a method for all parent or child tables at once, right‑click a Table Access cell and select Set All Default, Set All Force Key Lookup, or Set All Force Scan from the shortcut menu.
Key Lookup Limit
The maximum number of key lookups that are done at one time for a table. Valid values are 1 - 100. By default, Optim looks up one key at a time.
Increasing the Key Lookup Limit might significantly improve performance. For example, if you specify 5 as the Key Lookup Limit and the key has a single column, five key values are searched in a single request to the DBMS.
To display the Key Lookup Limit dialog, right-click a Key Lookup Limit cell and select the Set All... command from the shortcut menu.

Use the Key Lookup Limit dialog to set all values in the parent or child tables at once.
Ignore Empty Relationship
Option to exclude rows from processing if their relationship has an empty value. Optim will not attempt to fetch related rows for this relationship. You can ignore relationships with values equal to null, blank, zero length, any numeric value you choose, or any combination of these options. This option is available if you select Advanced Options from the Options menu.
To use this option, in the Ignore Empty Relationship grid column, right-click the cell for a relationship to display this menu.
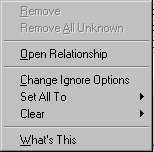
- Open Relationship
- Opens the Relationship Editor. For details, see Open the Relationship Editor.
- Change Ignore Options
- Opens the Ignore Options dialog.
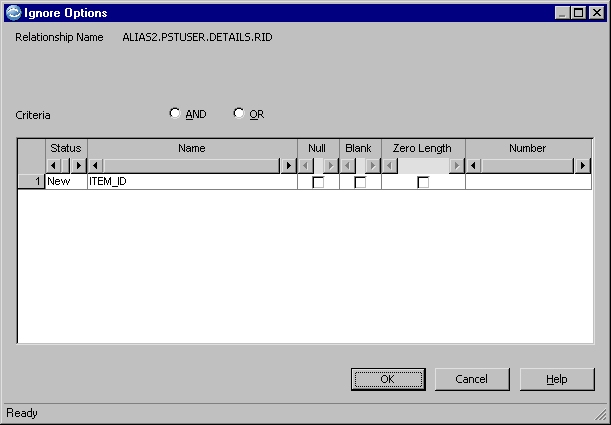
- Criteria AND OR
- Determines whether criteria are combined. Selecting AND causes a relationship to be ignored if all relationship columns match the criteria. Selecting OR causes a relationship to be ignored if any columns match the criteria. To select a value, click the button next to it.
- Status
- The status of the relationship. Status is populated automatically and cannot be modified.
- Name
- Name of the foreign key for the relationship. You cannot modify this value.
- Null
- Select the check box in this column to ignore null values. This option is valid for all data type columns.
- Blank
- Select the check box in this column to ignore blank values. This option is valid for fixed and variable length character columns.
- Zero Length
- Select the check box in this column to ignore zero length values. This option is valid for variable length character columns.
- Number
- To ignore a numeric value, enter the value in this column. This option is valid for INTEGER type numeric columns.
- Sets ignore options for all relationships in the Access Definition. If you use this option, it supersedes any ignore option set previously for this Access Definition.
- Removes ignore options for a relationship. Use Clear All to remove ignore options for all relationships in the Access Definition.
Relationship
Fully qualified name of the relationship. You cannot modify this value. A relationship name is in four parts: dbalias.creatorid.tablename.constraint.
- dbalias
- Alias for the database in which the child table is defined (1 - 12 characters).
- creatorid
- Creator ID assigned to the child table (1 - 64 characters).
- tablename
- Name of the child table (1 - 64 characters).
- constraint
- Base name that is assigned to the relationship (1 - 64 characters).
Use new relationships
This check box is selected by default. Use it to include all relationships with New status in a process.
If you clear this check box, new relationships must be selected manually to be included in a process.
Examples
The following examples use a simple database structure to explain how relationships are traversed using an Access Definition to select a subset of data. This database structure includes four tables: CUSTOMERS, ORDERS, DETAILS, and ITEMS. Based on the relationships between each pair of tables:
- CUSTOMERS is the parent to ORDERS.
- ORDERS and ITEMS are the parents to DETAILS.
Example 1: Basic Traversal Path
The Basic Traversal path is from parent to child as shown next:

The traversal path begins at the Start Table and proceeds through the data model, traversing relationships from parent to child. For example, if the Start Table is CUSTOMERS, the process traverses from ORDERS to DETAILS.
Example 2: Multiple Parent Tables
To select all the ORDERS, DETAILS, and ITEMS rows that are related to a specific set of CUSTOMERS rows:
- Specify CUSTOMERS as the Start Table.
- Specify selection criteria for the appropriate set of customers.
- Select Option (1) for the relationship
RIDbetween ITEMS and DETAILS to traverse from child to parent.
The process selects:
- Rows from the CUSTOMERS table.
- Related child rows in the ORDERS
table to satisfy the relationship
RCObetween CUSTOMERS and ORDERS. - Related child rows in the DETAILS
table to satisfy the relationship
RODbetween ORDERS and DETAILS. - Related parent rows from the ITEMS table for every child row that is selected from the DETAILS table. This step satisfies the relationship RID between ITEMS and DETAILS, according to Option (1).
Example 3: Child as a Start Table
To select all ORDERS rows for CUSTOMERS that placed specific ORDERS:
- Specify ORDERS as the Start Table.
- Use Point and Shoot to select the specific set of ORDERS rows.
- Select Option (1) and Option (2)
for the relationship
RCObetween CUSTOMERS and ORDERS. The process traverses from ORDERS (child) to CUSTOMERS (parent) and back to ORDERS (child) to select all orders for each selected customer.
In this example, use Point and Shoot with the
ORDERS table as the Start Table to select ORD2. The
related CUSTOMERS row B has three related ORDERS rows, ORD1, ORD2,
and ORD3. The rows are selected in the sequence that
is shown in this example.

- STEPS
- ORDERS row
ORD2is selected using Point and Shoot. - The CUSTOMERS row B is selected because of Option (1).
- ORDERS rows
ORD1andORD3are selected because of Option (2).
- ORDERS row
Because you selected Option (2), the process selects additional ORDERS table rows for every parent row that is selected from the CUSTOMERS table.
Example 4: Multiple Relationships
In this example, orders are shipped only when all items are available. If one ordered item is out of stock, the order is not shipped to the customer. To identify orders that are outstanding because of an out-of-stock item, the set of selected data must include full details on all orders.
To obtain complete details, select data from the CUSTOMERS, ORDERS, DETAILS, and ITEMS tables:
- Specify the ITEMS table as the Start Table.
- Specify selection criteria to select out-of-stock-ITEMS rows. (Select items with a quantity of 0.)
- Select Option (1) for all relationships.
- Select Option (2) for the relationship
RODbetween ORDERS and DETAILS.
The process begins as described in the next illustrations.
RID from
parent to child.- ITEMS to DETAILS

Step 1–The ITEMS row with a quantity of zero is selected based on the selection criteria.
Step 2–The DETAILS rows that contain the item are selected because of the parent to child traversal of relationship
RID.
The process selects ORDERS related to DETAILS, followed by CUSTOMERS related to ORDERS.
- DETAILS to ORDERS and ORDERS to CUSTOMERS

Step 3–The ORDERS that are related to these DETAILS rows are selected by traversing the relationship
RODfrom child to parent because Option (1) is selected.Step 4–The CUSTOMERS that placed the ORDERS are selected by traversing the relationship
RCOfrom child to parent because Option (1) is selected.
The process selects additional DETAILS related to the ORDERS.
- ORDERS to DETAILS

Step 5–The additional DETAILS that are part of the ORDERS are selected because Option (2) is selected for the relationship between ORDERS and DETAILS.
The process selects ITEMS for the additional DETAILS.
- DETAILS to ITEMS

- Step 6–The ITEMS for the additional DETAILS are selected because Option (1) is selected for the relationship between ITEMS and DETAILS.
Example 4 Completes
The
process selects only the ORDERS for selected ITEMS. The process does
not select additional ORDERS for selected CUSTOMERS because you did
not select Option (2) for the relationship RCO between
CUSTOMERS and ORDERS.
Example 5: Multiple Children
Some tables are parent to more than one child table. Options (1) and (2) apply only to each pair or tables that share a relationship. For example, if the process selects a row in the CUSTOMERS table because you selected Option (1) for the relationship between CUSTOMERS and ORDERS, then Option (2) applies only to related rows from the ORDERS table. To select data from other child tables, you must select Option (2) for those relationships.
In this example, the SHIP_TO and ORDERS tables are children of the CUSTOMERS table. To obtain the shipping information for specific orders:
- Specify the ORDERS table as the Start Table.
- Specify the selection criteria for the appropriate set of ORDERS.
- Select Option (1) for the relationship
RCObetween CUSTOMERS and ORDERS. - Select Options (1) and (2) for the
relationship
RCSTbetween CUSTOMERS and SHIP_TO.
The process begins as described in the next example:
- ORDERS to CUSTOMERS to SHIP_TO

Step 1 - A single ORDERS row is selected based on the selection criteria.
Step 2 - The CUSTOMERS row is selected because Option (1) is selected for the relationship
RCObetween CUSTOMERS and ORDERS.Step 3 - The SHIP_TO row is selected because Option (2) is selected for the relationship
RCSTbetween CUSTOMERS and SHIP_TO.
Example 6: Traversal Cycles
You can direct a process to cycle through (revisit) tables to select data. These traversal cycles depend on the options you specify for each relationship.
Extending Example 4 (Multiple Relationships) to select all related data about orders for an out-of-stock item, a traversal cycle results by selecting all items that have a quantity of zero. To obtain a complete set of orders:
- Specify ITEMS as the Start Table.
- Clear the check box for the relationship between CUSTOMERS and ORDERS (The CUSTOMERS table is not needed in this example.)
- Select Option (1) for the relationship
RODbetween ORDERS and DETAILS. - Select Option (1) for the relationship
RIDbetween ITEMS and DETAILS. - Select Option (2) for the relationship
RODbetween ORDERS and DETAILS.
The process does the following steps to complete a traversal cycle:
- Selects the ITEMS that have a quantity of zero.
- Selects DETAILS related to those
ITEMS by traversing the relationship
RIDfrom parent to child. - Selects ORDERS related to the DETAILS
by traversing the relationship
RODfrom child to parent. (Option (1) for that relationship is Yes.) - Selects additional DETAILS for those
ORDERS by traversing the relationship
RODfrom parent to child. (Option (2) for that relationship is Yes.) - Selects ITEMS related to the additional
DETAILS by traversing the relationship
RIDfrom child to parent. (Option (1) for that relationship is Yes.)
Multiple Traversal Cycles
In Example 6, the process starts and ends at the ITEMS table to complete one cycle, but a process can also include multiple traversal cycles.
Example 6 can be extended to show multiple, although unlikely, traversal cycles. After selecting ITEMS rows for additional items in Step 5, it is necessary to select ORDERS and DETAILS rows for these ITEMS. This is done by selecting Option (2) for the relationship RID.
After Step 5 in the example, the process
traverses the relationship RID from parent to child
to select the remaining DETAILS rows that are related to these additional
ITEMS. Then, the process repeats Steps 3, 4, and 5 to select additional
ORDERS, the DETAILS rows that are related to those ORDERS, the ITEMS
rows that are related to those DETAILS, and so on.
Example: Selection of Referential Cycles
You can select data from tables that are related to each other by referential cycles. In a referential cycle, the process starts at one table and returns to it after traversing one or more relationships. (In contrast, for many databases, a process proceeds up or down through the hierarchy or the network and never returns to the Start Table.)
The following examples use two tables, DEPARTMENT and EMPLOYEE. The tables are defined as follows:
| DEPARTMENT | EMPLOYEE | ||||
|---|---|---|---|---|---|
DEPT_ID |
DEPT_NAME |
MGR_ID |
EMP_ID |
EMP_NAME |
DEPT_ID |
The DEPT_ID is the primary
key of the DEPARTMENT table. The EMP_ID is the primary
key of the EMPLOYEE table. The relationships between the DEPARTMENT
and EMPLOYEE tables are shown next:

The relationships that are used in the following examples are defined as follows:
| Relationship | Parent Table.Column | Child Table.Column |
|---|---|---|
| MANAGER | EMPLOYEE.EMP_ID | DEPARTMENT.MGR_ID |
| MEMBER | DEPARTMENT.DEPT_ID | EMPLOYEE.DEPT_ID |
The data in each table is as follows:
- Department
-
DEPT_ID DEPT_NAME MGR_ID A Executive 1 B Finance 2 C Sales 3 D Development 4 E Bookkeeping 5 F Support 9 - Employee
-
EMP_ID EMP_NAME DEPT_ID 1 Fred 2 Bill A 3 John A 4 Laurie A 5 Bobbie B 6 Don B 7 Pat C 8 Zack C 9 Meghan D 10 Tim D 11 Jack D 12 Diane E 13 Dick E 14 Jill F 15 Melanie F
The following is a sample company organization chart:

In the next examples, a sample query demonstrates how to handle cyclic relationships by selecting Options (1) and (2) for different relationships. Changing these options affects the set of data that is selected from each table.
Example 7
To select the names of all employees in the Development Department, including employees that are members of subordinate departments:
- Specify the DEPARTMENT table as the Start Table.
- Use Point and Shoot to select the
row in the DEPARTMENT table, where
DEPT_ID = D. - Do not select Options (1) and (2) for relationships because the process always follows the existing relationships using the basic traversal path from parent to child.
The process does these steps:
- Selects the row that contain the
Development Department,
Dept_ID=‘D', from the DEPARTMENT table. - Using the relationship MEMBER,
search the EMPLOYEES table for all employees in the Development Department,
EMPLOYEE.DEPT_ID=‘D'.
Three EMPLOYEE rows are extracted.
EMP_ID = 9EMP_ID = 10
EMP_ID = 11 - Use the relationship MANAGER to
search the DEPARTMENT table to determine whether any of the selected
employees are managers. The employee with
EMP_ID = 9, Meghan, is a manager of the Support Department,DEPT_ID = ‘F'. Select this row from the DEPARTMENT table. - Use the relationship MEMBER to
search the EMPLOYEE table to select all employees that belong to the
Support Department,
DEPT_ID = ‘F'.
Two EMPLOYEE rows are selected.
EMP_ID = 14
EMP_ID = 15 - Use the relationship MANAGER to search the DEPARTMENT table to determine whether either of the two selected rows in step 4 are managers. They are not, and the process stops.
Example 7 Completes
When the process completes, two rows are selected from the DEPARTMENT table and five rows are selected from the EMPLOYEE table:
| DEPARTMENT | EMPLOYEE |
|---|---|
DEPT_ID='D' |
EMP_ID = 9 |
DEPT_ID='F' |
EMP_ID = 10 |
EMP_ID = 11 |
|
EMP_ID = 14 |
|
EMP_ID = 15 |
Example 8
To select the manager of the Development Department in addition to all employees in the Development Department and subordinate departments (Example 7):
- Specify the DEPARTMENT table as the Start Table.
- Use Point and Shoot to select the
row in the DEPARTMENT table, where
DEPT_ID = D. - Select the relationship MANAGER between EMPLOYEE (parent) and DEPARTMENT (child).
- Select Option (1) for the relationship MANAGER. This option selects the manager of the Development Department by traversing from child to parent.
The process follows the steps that are described
for Example 7. In addition, Step 4 traverses the relationship MANAGER
from DEPARTMENT (child) to EMPLOYEE (parent), based on Option (1).
As a result, the process selects MGR_ID = 4 to identify
the manager of the Development Department (Laurie) and selects a row
from the EMPLOYEE table, EMP_ID = 4 (Laurie).
Example 9
To select any other departments that this manager manages in addition to all employees in the Development Department and the manager of the Development Department:
- Specify the DEPARTMENT table as the Start Table.
- Use Point and Shoot to select the
row in the DEPARTMENT table, where
DEPT_ID = D. - Select the relationship MANAGER between EMPLOYEE (parent) and DEPARTMENT (child).
- Select Option (1) for the relationship MANAGER. This option selects the manager of the Development Department by traversing from child to parent.
- Select Option (2) for the relationship MANAGER. This option selects other departments that are headed by the manager of the Development Department by traversing from parent to child.
The process follows the steps that are described for Example 8. In addition, after Laurie is selected from the EMPLOYEE table, the process follows the MANAGER relationship from EMPLOYEE (parent) to DEPARTMENT (child). The process traverses the DEPARTMENT table to see whether Laurie is manager of any other department. Based on the employee hierarchy for these examples, no additional rows are selected. Laurie manages only the Development Department.
Example 10
In addition to all employees in the Development Department, the manager of the Development Department, and any other departments under that manager, extend the example to select any other departments of which the manager of the Development Department is a member. To do this:
- Specify the DEPARTMENT table as the Start Table.
- Use Point and Shoot to select the
row in the DEPARTMENT table, where
DEPT_ID = D. - Select the relationship MANAGER between EMPLOYEE (parent) and DEPARTMENT (child).
- Select Option (1) for the relationship MANAGER. This option selects the manager of the Development Department by traversing from child to parent.
- Select Option (2) for the relationship MANAGER. This option selects other departments under the manager of the Development Department by traversing from parent to child.
- Select the relationship MEMBER between DEPARTMENT (parent) and EMPLOYEE (child).
- Select Option (1) for the relationship MEMBER. This option selects other departments to which the manager of the Development Department is a member by traversing from child to parent.
In this example, after Laurie is selected from
the EMPLOYEE table, the process follows the MEMBER relationship from
EMPLOYEE (child) to DEPARTMENT (parent) based on Option (1). The process
traverses the DEPARTMENT table to see whether Laurie is a member of
any other department. Laurie is a member of the Executive Department.
The process selects an additional row from the DEPARTMENT table, DEPT_ID
= A.
In addition, because you selected
Option (1) for the MANAGER relationship, the process traverses from
DEPARTMENT (child) to EMPLOYEE (parent) to select an additional row
from the EMPLOYEE table, EMP_ID = 1. (Fred is the
manager of the Executive Department.)
Example 11
In this example, select only employees that are members of the Development Department. Unlike Example 7, do not select employees in subordinate departments. This process disables the referential integrity (RI) cycle:
- Specify the DEPARTMENT table as the Start Table.
- Use Point and Shoot to select the
row in the DEPARTMENT table, where
DEPT_ID = D. - Clear the check box for the relationship MANAGER between EMPLOYEE (parent) and DEPARTMENT (child).
- Select the relationship MEMBER between DEPARTMENT (parent) and EMPLOYEE (child), which represents the basic traversal cycle.
- Clear the Option (1) check box for the relationship MEMBER. This option is not necessary.
In this example, Step 3 disables the RI cycle. The DEPARTMENT row for the Development Department is selected. Then, using the relationship MEMBER, the process traverses from parent to child to select the three employees in the department. Because the MANAGER relationship is unselected, it is not traversed. The process is complete.