About cookies on this site Our websites require some cookies to function properly (required). In addition, other cookies may be used with your consent to analyze site usage, improve the user experience and for advertising. For more information, please review your options. By visiting our website, you agree to our processing of information as described in IBM’sprivacy statement. To provide a smooth navigation, your cookie preferences will be shared across the IBM web domains listed here.
Tutorial
Deliver hybrid Android applications with JSON
Mix JavaScript, JSON, and Android-SDK Java code for flexible mobile apps
On this page
Archived content
Archive date: 2024-03-29
This content is no longer being updated or maintained. The content is provided “as is.” Given the rapid evolution of technology, some content, steps, or illustrations may have changed.The majority of applications available to mobile users are written by mobile developers via the core SDKs provided by the respective platform vendors. The popularity of mobile devices coupled with the large number of talented web technology programmers who have earned their stripes across the web over the past two decades has led to a new model of application – the hybrid application. Hybrid applications exist for both iPhone and Android, though our focus in this article is on Android hybrid applications and the use of JavaScript and JSON.
There are a number of hybrid application platforms that have had varying degrees of success. These include PhoneGap, Cordova, ionic, Titanium, NativeScript, React Native, and Xamarin. Each one of these platforms has pros and cons. The purpose of this article is to focus on the core plumbing underlying any of the native+browser interchange. After reading this tutorial, you will be better equipped to choose a hybrid platform that best suits your needs: technical, licensing, development workflow, etc.
The hybrid application is built around the WebKit engine found in Android’s WebView control. This is a user interface “widget” that exposes the WebKit’s capabilities to an Android programmer. The control can be used to render remote web pages within an application, to provide a familiar user interface experience for developers and users alike, and to leverage the powerful and flexible JavaScript environment within a native Android application.
This tutorial looks under the hood of Android hybrid applications with a particular focus on the exchange of data between the embedded browser and its host application. Multiple data-sharing strategies are shown, with an example of JSON as the preferred vehicle for flexible communications.
With each subsequent release, Android and iPhone are leapfrogging one another to offer the latest desirable features and to grab market-share. The hardware platforms are robust and the built-in software applications and features are intuitive and compelling, however what sets iPhone and Android apart from the rest of the pack is their ability to render web content seamlessly and to attract developers to create custom content in the form of new applications. If you can imagine it, there’s an "app for that."
Like iOS devices, the Android platform enjoys an excellent reputation as a mobile content viewing device. The heart of this capability stems from the inclusion of the open source browser engine known as WebKit. When most programmers think of WebKit, they think of a very capable browser rendering "real" websites effectively opening up the entire web to the mobile device by way of "web applications."
The existence of a high-function mobile browser that doesn’t major in compromise is great news, however if we stop there, we have really missed the most exciting aspect of all: the embedded browser.
Android applications can embed the WebKit engine directly into an Android Activity, bringing top quality rendering directly into the control of mobile developers. This approach brings value to both the experienced mobile developer and to the new-to-mobile developer looking to leverage existing web programming skills.
This tutorial is a follow-up to a prior tutorial on XML and JSON data handling in Android, Explore the benefits of JSON and XML in Android applications. In particular, this tutorial demonstrates techniques for constructing hybrid Android applications and the use of JSON to effectively move data between the Android application and WebKit environment.
The fundamentals of creating a hybrid application are presented, including multiple data transfer and application logic scenarios. Exchanging simple strings can be done without JSON, however, as the complexity of data structures increases, the use of a simple Java or JavaScript function with finite signatures becomes taxed and inflexible. To create more dynamic and data-driven applications, including perhaps a distributed mobile application capable of performing somewhat arbitrary mathematical calculations on a fleet of mobile devices, a more capable solution is required.
To begin to meet this challenge, we build on the learning from our prior article by leveraging JavaScript Object Notation (JSON). The culmination of this tutorial is a demonstration of the use of JSON to package and share data between an Android application and its embedded web browser control. I'll walk you through the code in the tutorial, but you can download the code from my GitHub repo.
Let's begin with a look at embedding a WebKit engine directly into an Android application.
A JavaScript calculator embedded into Android
The majority of SDK-based Android applications contain one or more implementations of the Activity class. The Activity class is essentially a screen or page; in other words, the screen and user interface elements experienced by the application user.
The Activity displays a collection of programmer-defined user interface elements such as buttons, labels, text entry boxes, radio buttons lists, and so on. All the expected items are present in the Android SDK. In addition to these user interface staples, there is a special widget, known simply as the WebView.
The WebView is added to an Android screen in much the same way that other user interface elements find themselves on the screen. The WebView can be added either to a layout xml file or created programmatically at run time.
As an aid to understanding these topics, this article presents screen captures and code listings from a simple application that demonstrates a WebView in action. Before diving into the specifics of how the application is constructed, let’s take a moment to review the various features of the application.
The accompanying application, named AndroidJSON, contains traditional user interface elements such as a TextView (a static label), an EditText (a text box), four Buttons, and a single instance of a WebView control. The WebView is displaying an HTML file that is packaged as an asset of the Android application, though it could be downloaded from the Internet as well. The files of interest in this project are MainActivity.java, activity_main.xml (UI layout file), and index.html. Figure 1 shows a screen capture of the project within the Android Studio environment.
Figure 1. The project in AndroidStudio

For more information on building Android applications, see Resources.
Figure 2 shows the application in action.
Figure 2. Demonstrating the JavaScript calculator in action
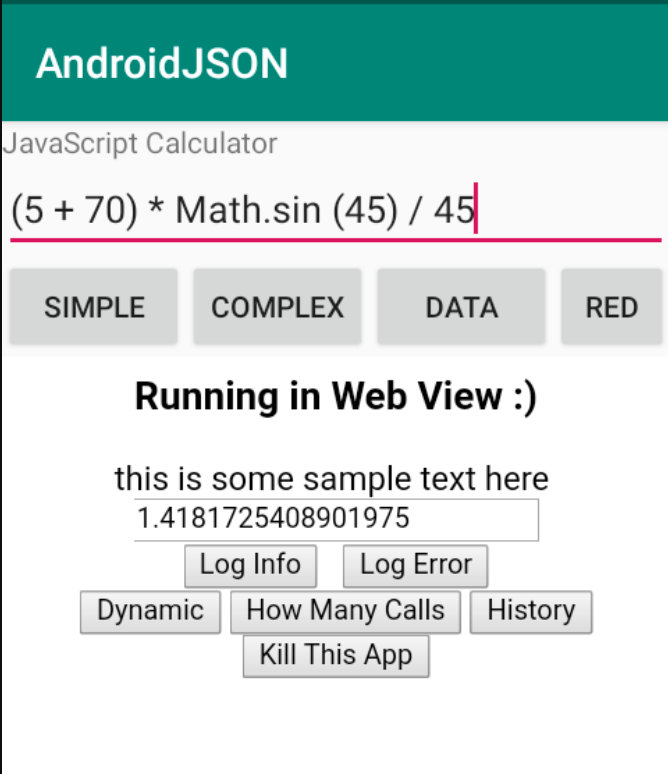
First, let’s examine the functionality of the four Buttons in the Activity:
- Simple: Causes the contents of the EditText to be evaluated as a mathematical expression. Note that the contents of the EditText, or the formula, is passed to the WebView control and evaluated in JavaScript.
- Complex: Sends a JSON object to the WebView for evaluation. This is considered complex due to the fact that the object is subsequently interpreted in JavaScript code and manipulated mathematically. This button alternates between a function to add elements of an array of integers and a function to multiply the same array of integers.
- Data: Initiates a JavaScript function residing in the WebView to initiate a jQuery Ajax call to download a web page and populate the input field in the WebView with the contents of the remote webpage.
- Make Red: Largely here for fun. When selected, this button applies a style to the embedded WebView’s content – turning text elements contained within the tag to become red.
Now, let's examine the functionality within the index.html file, enabled at runtime by the embedded WebView control:
- Log Info: Invokes a callback in the Android application to write an entry to the application log under the Info category.
- Error Info: Invokes a callback in the Android application to write an entry to the application log under the Error category.
- Dynamic: Invokes a callback in the Android application to retrieve a piece of text that represents valid JavaScript code. This code is brought back into the WebView and executed, demonstrating interaction between both sides of the application. Note that this approach is vulnerable to some security exploits due to a blind reliance upon the JavaScript eval function, however our focus here is on the plumbing, not a complete production-ready application.
- How many calls: Each time one of the callback functions is invoked, a counter is incremented. This button simply displays the number of times the Android/WebView intersection has been crossed.
- History: Each time one of the JavaScript functions is invoked, a string representing the function name is added to a JavaScript array. When the History button is invoked, a JSON object representing this array is sent back to the Android application, with the results displayed in the log.
- Kill this App: Another one of the just for fun features of this application. This button invokes a callback that terminates the Android activity via a call to
finish().
With this explanation of the functionality of the application out of the way, let's have a look at how the user interface is constructed.
Setting up the user interface
Creating the user interface for this application involves all three of the previously introduced files. Let’s begin with the layout file: main.xml, shown in Listing 1:
<?xml version="1.0" encoding="utf-8"?>
<LinearLayout xmlns:android="http://schemas.android.com/apk/res/android"
    android:orientation="vertical"
    android:layout_width="fill_parent"
    android:layout_height="fill_parent"
    >
    <TextView android:layout_width="fill_parent"  android:layout_height="wrap_content" android:text="@string/title" />
    <EditText android:id="@+id/formula" android:layout_width="fill_parent"      android:layout_height="wrap_content" android:text="" android:visible="False" />
    <LinearLayout xmlns:android="http://schemas.android.com/apk/res/android"
        android:orientation="horizontal"
        android:layout_width="fill_parent"
        android:layout_height="wrap_content">
        <Button android:text="Simple" android:id="@+id/btnSimple" android:layout_width="wrap_content" android:layout_height="wrap_content"></Button>
        <Button android:text="Complex" android:id="@+id/btnComplex" android:layout_width="wrap_content" android:layout_height="wrap_content"></Button>
        <Button android:text="Data" android:id="@+id/btnData" android:layout_width="wrap_content" android:layout_height="wrap_content"></Button>
        <Button android:text="Red" android:id="@+id/btnRed" android:layout_width="wrap_content" android:layout_height="wrap_content"></Button>
    </LinearLayout>
    <WebView android:layout_width="fill_parent" android:layout_height="fill_parent" android:id="@+id/calculator" android:layout_weight="1" />
</LinearLayout>
As seen in Listing 1, the layout contains the various user interface elements. Note that the presence of the android:id attribute enables the application to make reference to a specific widget within the layout. For example, the WebView contains an id of calculator; however, the TextView does not contain an id as its value is not changed throughout the lifetime of the application.
The onCreate() method found in MainActivity.java is responsible for inflating the layout as shown in Listing 2:
public class MainActivity extends AppCompatActivity {
    private final String tag = "AndroidJSON";
    private WebView browser = null;
    private int flipflop = 0;

    @Override
    protected void onCreate(Bundle savedInstanceState) {
        super.onCreate(savedInstanceState);
        setContentView(R.layout.activity_main);


        final EditText formula = (EditText) this.findViewById(R.id.formula);
        final Button btnSimple = (Button) this.findViewById(R.id.btnSimple);
        final Button btnComplex = (Button) this.findViewById(R.id.btnComplex);
        final Button btnRed = (Button) this.findViewById(R.id.btnRed);
        final Button btnData = (Button) this.findViewById(R.id.btnData);
        // remaining code removed for brevity – shown in next listings
}
The layout is inflated with a call to setContentView(). Note that the user interface elements are set up for manipulation by calling the findViewById() method. The R.java file is automatically generated each time the activity_main.xml file is saved. Layout elements containing the android:id attribute become values within the auto-generated R.id class. A subset is shown in Listing 3:
package com.navitend.androidjson;


public final class R {
         // ...
         public static final class id {
                public static final int btnComplex=0x7f070022;
                public static final int btnData=0x7f070023;
                public static final int btnRed=0x7f070024;
                public static final int btnSimple=0x7f070025;
                public static final int buttonPanel=0x7f070026;
                public static final int calculator=0x7f070027;
                public static final int center=0x7f070028;
                public static final int center_horizontal=0x7f070029;
                // ...
         }
}
We will revisit the Button setup code later in this article; for now, let’s focus on the setup of the WebView control or widget. While the Button and other user interface elements are rather straightforward, the WebView takes a noticeably greater effort. Don’t worry though – it is not that difficult, particularly considering the tried and true cut-and-paste technique often applies. Let’s have a look at the snippet shown in Listing 4, which is again taken from the onCreate() method found in MainActivity.java:
        // connect to our browser so we can manipulate it
        browser = (WebView) findViewById(R.id.calculator);

        // set a webview client to override the default functionality
        browser.setWebViewClient(new wvClient());

        // get settings so we can config our WebView instance
        WebSettings settings = browser.getSettings();

        // JavaScript?  Of course!
        settings.setJavaScriptEnabled(true);

        // clear cache
        browser.clearCache(true);

        // this is necessary for "alert()" to work
        browser.setWebChromeClient(new WebChromeClient());

        // add our custom functionality to the javascript environment
        browser.addJavascriptInterface(new CalculatorHandler(), "calc");

        // uncomment this if you want to use the webview as an invisible calculator!
        //browser.setVisibility(View.INVISIBLE);

        // load a page to get things started
        browser.loadUrl("file:///android_asset/index.html");
Looking at the code in Listing 4, note that an Activity scoped variable named browser is wired up to the WebView control. The WebView is a fairly complex class that can be highly customized. For instance, there are a couple of classes that need to be set up in order to get the expected functionality associated with a web browser. This is one of those exercises where the programmer must put in a certain minimum amount of effort to get some useful functionality however the sky is the limit in just how far to take this customization. For the purposes of this application, the WebView control is somewhat minimally deployed.
An instance of a WebViewClient class is created and assigned. The WebViewClient provides hooks for capturing various events such as page load start and end, form resubmission, keyboard intercepting, and many other events programmers love to trap and manipulate. Similarly, an instance of the WebChromeClient is required for permitting functions such as the helpful alert() JavaScript function. The WebSettings class is used to enable JavaScript for the control.
To cause the WebView control to navigate to a page, the programmer has a couple of different options. This application employs the loadurl() method with a fully qualified path for the index.html file packaged as an asset of the project. For more information on setting up the WebView control, examine the documentation for the android.webkit package online.
Wiring up the JavaScript interface
The next step is to enable the Java code within the Activity to interact with the JavaScript code within the html file managed by the WebView. This is accomplished with a call to the addJavascriptInterface() method, as shown in Listing 4.
The arguments to this function are an instance of a Java class and a namespace identifier. For example, this application defines a namespace of calc and implements the code in a class named CalculatorHandler, shown in Listing 5.
// Javascript handler
    final class CalculatorHandler
    {
        private int iterations = 0;

        // write to LogCat (Info)
        @JavascriptInterface
        public void Info(String str) {
            iterations++;
            Log.i("Calc",str);
        }

        // write to LogCat (Error)
        @JavascriptInterface
        public void Error(String str) {
            iterations++;
            Log.e("Calc",str);
        }

        // sample to retrieve a custom - written function with the details provided by the Android native application code
        @JavascriptInterface
        public String GetSomeFunction()
        {
            iterations++;
            return "var q = 6;function dynamicFunc(v) { return v + q; }";
        }

        // Kill the app
        @JavascriptInterface
        public void EndApp() {
            iterations++;
            finish();
        }

        @JavascriptInterface
        public void setAnswer(String a)
        {
            iterations++;
            Log.i(tag,"Answer [" + a + "]");
        }

        @JavascriptInterface
        public int getIterations()
        {
            return iterations;
        }

        @JavascriptInterface
        public void SendHistory(String s)
        {
            Log.i("Calc","SendHistory" + s);
            try {
                JSONArray ja = new JSONArray(s);
                for (int i=0;i<ja.length();i++) {
                    Log.i("Calc","History entry #" + (i+1) + " is [" + ja.getString(i) + "]");
                }
            } catch (Exception ee) {
                Log.e("Calc",ee.getMessage());
            }
        }

    }
Within the JavaScript environment, the CalculatorHandler’s methods are accessed via the window.calc.methodname syntax. For example, the CalculatorHandler implements a method named Info(), which takes a string argument and writes it to the application log. To access this method from the JavaScript environment, use syntax such as this:
window.calc.Info(“write this string to the application log!”);
Important note: In order for a method to be accessible from the Javascript environment in the WebView, it must be declared to implement the JavascriptInterface:
@JavascriptInterface
With this basic understanding of how the Java code is invoked from JavaScript code, let’s examine the index.html file in Listing 6 to see how the various methods are invoked.
<html>
<head>
<title>Android to JavaScript with JSON</title>
    <script
            src="https://code.jquery.com/jquery-3.3.1.min.js"
            integrity="sha256-FgpCb/KJQlLNfOu91ta32o/NMZxltwRo8QtmkMRdAu8="
            crossorigin="anonymous"></script>
</head>
<script language="JavaScript">
var cmdHistory = new Array();
function startup() {
        try {
                window.calc.Info("Starting up....");
                cmdHistory[cmdHistory.length] = "startup";
        } catch (ee) {

        }
}

function getWebContent(url) {
    $('#data').val(url);
    try {
        $.ajax({
            url: url
            ,type: 'GET'
            ,crossDomain:true
            ,success: function(d){
                try {
                    $('#data').val(d);
                } catch (e) {
                    // handle error
                    alert('error: ' + e);
                }
            }
            ,error: function (a,b,c) {
                alert(a);
            }
            ,cache: false
        });
    } catch (e) {
        alert('error in GET');
    }
}

function PerformSimpleCalculation(formula) {
        try {
                cmdHistory[cmdHistory.length] = "PerformSimpleCalculation";
                var answer = eval(String(formula));
                document.getElementById('data').value = answer;
                window.calc.setAnswer(answer);
        }    catch (ee)     {
                window.calc.Error(ee);
        }
}
function PerformComplexCalculation(andmethod) {
    try    {
        /*
         * the argument to this function is a single object with two "members or properties"
         * operation: this is a string naming what we want the function to do.
         * array of arguments: this is an array of integers
         *
         */
        if (andmethod.operation == "addarray") {
            cmdHistory[cmdHistory.length] = "PerformCompleCalculation-addarray";
            var i;
            var result = 0;
            for (i=0;i<andmethod.arguments.length;i++) {
                result += andmethod.arguments[i];
            }
            document.getElementById('data').value = result;
            window.calc.setAnswer(result);
        }
        if (andmethod.operation == "multarray") {
            cmdHistory[cmdHistory.length] = "PerformCompleCalculation-multarray";
            var i;
            var result = 1;
            for (i=0;i<andmethod.arguments.length;i++) {
                result *= andmethod.arguments[i];
            }
            document.getElementById('data').value = result;
            window.calc.setAnswer(result);
        }
    }    catch (ee)    {
        window.calc.Error(ee);
    }
}
function dynamicfunction()
{
    try {
        cmdHistory[cmdHistory.length] = "PerformCompleCalculation-dynamic";
        eval(String(window.calc.GetSomeFunction()));
        var result = dynamicFunc(parseInt(document.getElementById('data').value));
        document.getElementById('data').value = result;
    }catch (ee) {
        alert(ee);
    }
}
</script>
<body >
<center>
<h3>Running in Web View :)</h3>
this is some sample text here <br />
<input type="text" id="data" value="starting value"><br />
<button onclick="window.calc.Info(document.getElementById('data').value);">Log Info</button>
<button onclick="window.calc.Error(document.getElementById('data').value);">Log Error</button><br />
<button onclick="dynamicfunction();">Dynamic</button>
<button onclick="alert(String(window.calc.getIterations()));">How Many Calls</button>
<button onclick="window.calc.SendHistory(JSON.stringify(cmdHistory));">History</button>
<button onclick="if (window.confirm('End App?')) window.calc.EndApp();">Kill This App</button><br />
</center>
</body>
</html>
Examine the button handlers towards the end of Listing 6. Essentially, these are calling methods in the window.calc namespace, which are implemented in the CalculatorHandler class in MainActivity.java.
Listing 5 and Listing 6 work hand in hand to demonstrate the code interaction initiated in the JavaScript environment and implemented in the Java source file. But how about initiating some action from the Activity code that we want to take place within the WebView?
It is time to look deeper into the Java code.
Inserting JavaScript code
Let’s start with the task of passing a mathematical formula to the JavaScript code for evaluation. One of the wonderful (and dangerous!) features of JavaScript is the eval() function. The eval() function permits the run-time evaluation of a string of code. In this example, a string is taken from the EditText control and passed to the JavaScript environment for evaluation. Specifically, the PerformSimpleCalculation() function found in Listing 6 is invoked.
This example demonstrates a simple user-initiated formula, but can you imagine a fleet of Android devices donating idle cycles to a larger project that must perform seemingly endless calculations? Of course, a security scheme would need to be implemented to prevent rogue code from executing on your phone; however, the idea of harnessing the computational power of hundreds of thousands of willing devices or more is intriguing.
Listing 7 includes the code from AndroidJSON.java, which is responsible for handling the button selections:
btnSimple.setOnClickListener(new OnClickListener()
        {
             public void onClick(View v) {
                 Log.i(tag,"onClick Simple");
                 // Perform action on click
                 try
                 {
                     String formulaText =  formula.getText().toString();
                     Log.i(tag,"Formula is [" + formulaText + "]" );
                     browser.loadUrl("javascript:PerformSimpleCalculation(" + formulaText + ");");
                 }
                 catch (Exception e)
                 {
                     Log.e(tag,"Error ..." + e.getMessage());
                 }
             }
        });
Despite the many lines of this method, the only one to focus on here is the browser.loadurl() line, which passes a string of the format: javascript:<code to execute>.
This JavaScript code is injected into the WebView’s current page and executed. In this way, the Java code can execute JavaScript code defined in the WebView.
In the Simple example, a string is passed; however, what about when we need to work with a more complex structure? Here is where JSON can aid us. Listing 8 shows the invocation of the PerformComplexCalculation() function, which can be seen in Listing 6.
btnComplex.setOnClickListener(new OnClickListener()
        {
             public void onClick(View v) {
                 Log.i(tag,"onClick Complex");
                 // Perform action on click
                 try
                 {
                     String jsonText = "";

                     if (flipflop == 0)
                     {
                         jsonText = "{ \"operation\" : \"addarray\",\"arguments\" : [1,2,3,4,5,6,7,8,9,10]}";
                         flipflop = 1;
                     } else {
                         jsonText = "{ \"operation\" : \"multarray\",\"arguments\" : [1,2,3,4,5,6,7,8,9,10]}";
                         flipflop = 0;
                     }
                     Log.i(tag,"jsonText is [" + jsonText + "]" );
                     browser.loadUrl("javascript:PerformComplexCalculation(" + jsonText + ");");
                 }
                 catch (Exception e)
                 {
                     Log.e(tag,"Error ..." + e.getMessage());
                 }

             }
        });
Examine the JavaScript function PerformComplexCalculation from Listing 6. Note that the argument passed in is not a string, but rather an object of our own creation.
operation: Name of a function or procedure to processarguments: This is an array of integers
The object contains only two properties but can be arbitrarily more complex to meet a greater need.
In this example, the PerformComplexCalculation() JavaScript function supports two different operations: addarray and multarray. When these have done their work upon invocation, the result is passed back to the Java code by calling the function: window.calc.setAnswer. Here, we see bidirectional data flows between Java and JavaScript and back again.
This example passed a JSON object, however one observation from experience is that when working with “strings” coming back from the Java code, it helps to convert them to JavaScript strings. This can be done by passing the value to the String function as shown in this example:eval(String(formula));.
The JavaScript eval() function likes JavaScript strings. Without the conversion the eval function basically does nothing.
For a somewhat more complex example, you are encouraged to walk through the code sequence when the Dynamic button is selected in the WebView.
Additionally, the native btnData Button invokes a Javascript function named getWebContent, which employs the popular jQuery library to fetch content from a web page and then display the resulting value.
To wrap up the code examples, let’s look at the passing of an array of strings from the JavaScript environment to the Java environment.
Exchanging JSON objects
The JavaScript code in the example application (index.html) records local function invocations into a page level array named cmdHistory. Each time a function is invoked a new entry is made to this array. For example, when the dynamicfunction() is invoked, a new string is stored: cmdHistory[cmdHistory.length] = "PerformComplexCalculation-dynamic";.
There is nothing particularly special about this approach; it is simply an example of usage data collection on the page level. Perhaps this data is useful to be stored within the Android application’s database. How does this data get back to the Java code?
To send our array of string objects the JSON.stringify function is called, passing in the array as the argument. Optionally, the stringify function can allow the customization of how a particular property of a complex Object is formatted.
Figure 3 shows what winds up in the log after parsing the JSON array after a typical run of the application.
Figure 3. Parsing out the JSON array sent from JavaScript

This example is only storing string data, so arguably we could simply append it to a longer string, call a simple function in the CalculatorHandler, which in turn would parse it out. However, what if the application wanted to track other data such as the value of certain variables or even attempt to profile the code by recording the duration of a particular function invocation? Clearly the ability to record and exchange Objects is of interest in more complex scenarios.
Summary
This tutorial demonstrated techniques of transferring data across the Android/Java to WebView/JavaScript divide as well as the more general topic of hybrid applications leveraging WebKit. Through the use of callback functions and dynamic JavaScript and JSON parsing, flexible application deployment strategies can be achieved.
Now that you've got the Android/Java application programming figure out, maybe you're up for learning how to use Bluetooth Low Energy (BLE) APIs to build IoT connected devices including an Android app.
